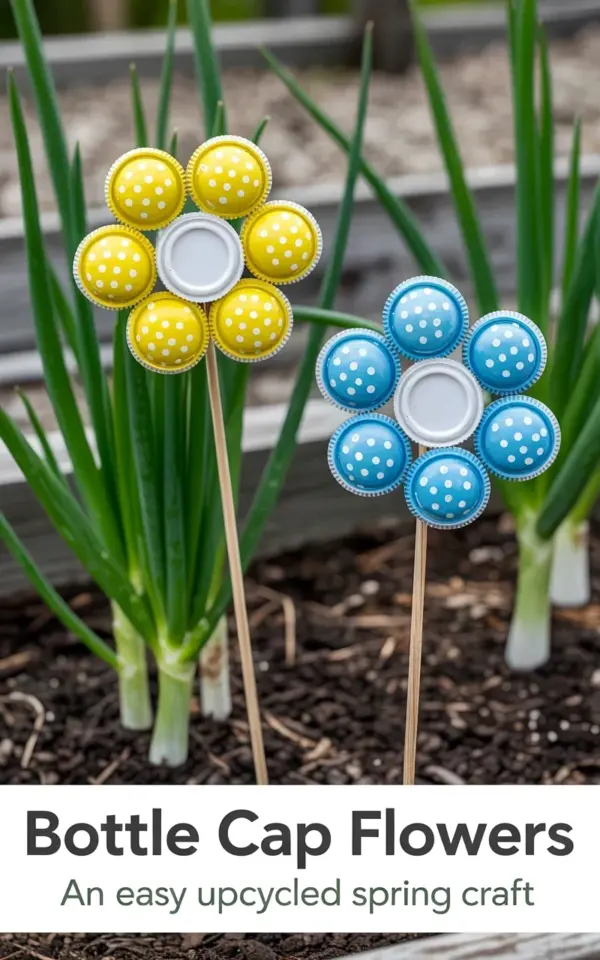
There is something genuinely satisfying about turning a throwaway item into something that makes you smile every time you step outside. These bottle cap garden flowers are exactly that kind of project. I made a pair recently, one in cheerful yellow with white polka dots and another in soft blue with the same playful pattern, and planted them right among the green onion stalks in a raised bed. The contrast between the bright caps and the dark soil with visible mulch creates a little handmade scene that feels both whimsical and intentional. If you are looking for a quick, low cost way to add personality to your outdoor space, this is a great place to start.
Why bottle cap garden flowers work for a spring garden refresh
Spring is the season when everything starts waking up, and our gardens often get the first round of tidying and planting. But not every corner needs to be filled with a new perennial or a fancy container. Sometimes the most memorable spots are the small, unexpected details. That is where upcycled crafts like these really shine. They are playful without trying too hard, and they hold up surprisingly well outdoors if you use a little weather protection.
I made my flowers specifically to tuck into the onion bed, because the tall green stalks create a natural backdrop. The yellow caps with white dots catch the morning light, and the blue ones add a cooler note that balances the warm soil tones. It is a very simple arrangement, but it has already sparked a few conversations with neighbors who stopped by to see what I was up to.
What you need to make polka dot bottle cap flowers
Gathering supplies for this project is straightforward. Most of the items are probably in your recycling bin or craft drawer already. Here is what I used:
- Bottle caps: Yellow and light blue caps work best for the look in the photo. You will need about five to six per flower, plus one white cap for the center of each.
- White craft paint: A small bottle of acrylic paint and a round dotting tool or the end of a paintbrush will make the polka dots.
- Thin wooden sticks: I used plain bamboo skewers, about 12 inches long. For a sturdier stem, you can use dowels or even twigs from the yard.
- Strong glue: A hot glue gun works quickly, but I actually prefer a good epoxy or outdoor craft glue for a longer lasting bond.
- Clear acrylic sealer: This is optional but highly recommended if your caps will face direct sun and rain.
You do not need many tools. A pair of pliers to flatten the edges of the caps slightly can help, but it is not essential if you are careful with glue.
How to assemble the bottle cap flowers step by step
Start by cleaning your bottle caps thoroughly. Leftover soda or beer residue can make the paint slippery. Let them dry completely. Then, paint your white polka dots onto the yellow and blue caps. I found that making the dots in a loose, uneven pattern looks more natural than perfect rows. Let the paint dry for at least 30 minutes.
Now arrange the caps in a flower shape. For each flower, place five or six colored caps in a circle with their rims facing up, like petals. The white cap goes in the center, rim also facing up. Use a generous amount of glue on the sides where the caps touch each other. Hold them in place for about 20 seconds. Then flip the whole flower over and glue the wooden stick to the back. I attached the stick to two of the caps for extra stability, not just the center cap.
Once the glue is fully set, give the entire flower a light coat of clear acrylic sealer. This step is not strictly necessary, but it keeps the paint from chipping and the metal from rusting too quickly. I did one coat and let it dry overnight before taking them outside.
Where to place your upcycled garden flowers for the best visual impact
In the photo, the flowers are nestled among green onion stalks, and that setting really works. The thin, vertical lines of the onions contrast nicely with the round, cheerful shapes of the caps. Dark soil with a bit of mulch grounds the whole scene and makes the bright colors pop. If you do not have onions, try planting your flowers among chives, lettuce, or even a patch of mint. Any low growing, leafy crop that provides vertical green will create a similar effect.
Consider the sunlight as well. Bottle caps are shiny, and direct sunlight can cause glare that washes out the polka dots. Morning or late afternoon light shows the patterns best. I placed my flowers on the east side of the bed so they catch soft light for a few hours, then sit in partial shade for the rest of the day. That also helps the glue and paint last longer.
How to customize your polka dot garden art for different seasons
The yellow and blue combination feels fresh for spring and summer, but you can easily adapt the same technique for other times of the year. For fall, try orange bottle caps with black dots and a black center. For winter holidays, red caps with white dots and a green center look festive tucked into a pot of rosemary. The key is to keep the color contrast strong and the scale small so the flowers do not overwhelm their surroundings.
You can also vary the number of petals. Five caps give a more daisy like look, while six caps make the flower appear fuller. If you want a taller flower, use two sticks taped together or a longer dowel. I have made a few single stem flowers and a couple with two flowers on one forked branch. The asymmetry adds interest.
Tips for making your bottle cap flowers last through the season
Garden art made from recycled materials is never going to be permanent, but you can extend its life with a few practical choices. Use outdoor rated glue, not basic school glue. The acrylic sealer is worth the extra five minutes. If a heavy rain is forecast, I sometimes bring the flowers inside for the night, but that is not necessary for most weather.
Check the wooden sticks every few weeks. If they get damp or start to rot at the soil line, you can trim the bottom and push them a bit deeper into the ground. I also recommend using a small pebble or a piece of broken pottery under the base of the stick to keep it from sinking into wet soil. These small adjustments keep the flowers standing straight and looking happy.
Using bottle cap garden art as a simple activity with kids or friends
This craft is great for a low key afternoon with children or a casual gathering of crafty friends. The painting step is forgiving, and even a messy dot pattern ends up looking charming. You can prep a pile of clean caps ahead of time and set out a few colors of paint, then let everyone make their own unique flower. The finished pieces make nice gifts for neighbors or teachers, especially if you pair them with a small pot of herbs.
I made my set alone, but I am already planning a second round with a few friends who saw the photo and asked for instructions. It is one of those projects that feels like a break from screens and to do lists, and the result is a genuine little piece of art that did not cost much or create new waste.
If you have a corner of your garden that could use a little handmade color, give these bottle cap flowers a try. They are quick to assemble, easy to personalize, and they remind you that creativity does not need a big budget. Start saving your yellow and blue caps, grab some paint, and see where a simple afternoon of upcycling takes you.
#bottlecapgarden #diygardenideas #upcycledcrafts #gardenart #polkadotcrafts
Leave a Comment