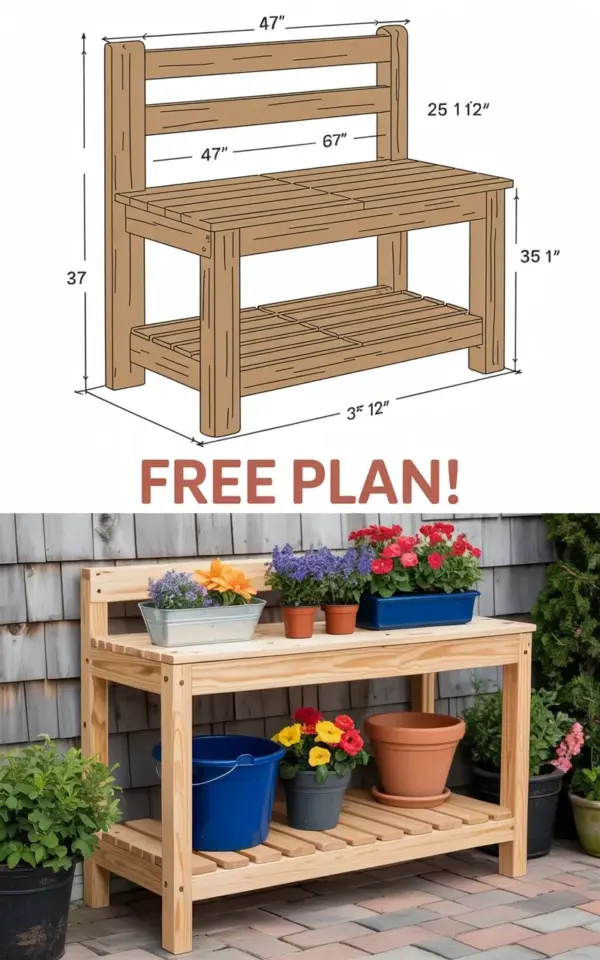
There are few things more satisfying than a clean, organized workspace, especially when it lives right where your garden does. This weekend, you can build a sturdy DIY potting bench that holds up under bags of soil, stacks of terra cotta pots, and the occasional muddy elbow. This free plan comes with a technical drawing that shows every measurement you need, so you are never guessing at the next cut. Before you grab your saw, though, let’s talk about the common mistakes that trip up most first-time builders, and exactly how to sidestep them.
Why a Technical Drawing Matters for Your Potting Bench Build
You might be tempted to just wing it, but a proper woodworking plan is your best friend here. The free diagram that comes with this project spells out the critical dimensions: it stands 47 inches tall, 27 1/2 inches wide, and 35 1/2 inches deep. These numbers are not random. The 47 inch height puts the work surface right at hip level for most people, which prevents back strain during long planting sessions.
The drawing also clarifies the joinery and the order of assembly. You can see exactly where the backrest slats attach and how the lower shelf locks into the legs. Without a visual guide, you might assemble the base and realize the shelf is now crooked, or the top slats leave a gap big enough to drop your trowel through. The diagram is your roadmap, so print it out and tape it to the wall.
Mistake #1: Overbuilding the Frame (And Why Simpler is Better)
One of the biggest mistakes you can make is thinking a heavier frame means a better bench. Yes, this bench needs to hold a few bags of potting soil, but it does not need to survive a zombie apocalypse. If you use 4×4 lumber for the legs on this 27 1/2 inch wide design, the bench will be comically heavy and hard to move around the yard.
Stick to the plan’s standard framing lumber dimensions. The design gives you all that strength through the slatted top and lower shelf bracing, not through massive posts. This keeps the bench light enough to drag into the shade when the afternoon sun gets intense, which is a gardening project requirement on hot days.
Mistake #2: Guessing the Slat Spacing on the Potting Bench Top
The slatted top surface is a core feature of this design, but people often struggle with the gaps. You want spaces between the slats so water and dirt fall through, keeping the surface mostly clean. However, if the gaps are too wide, small screws, seeds, and hand tools will vanish between the boards.
This is where the technical drawing saves you. The diagram shows the spacing on the top, so you can rip a spacer block from scrap wood to speed up the process. Lay the slats down, put the spacer between each one, and clamp the whole assembly together before driving the screws. It is a simple trick that guarantees even results, and your awl will stop falling through to the floor.
Mistake #3: Skipping the Backrest for a Potting Bench
Many free plans online omit the back, leaving you with just a table. That is a huge missed opportunity. This particular bench includes a backrest with two horizontal slats, which instantly transforms the piece from a table into a workstation. You can lean a whiteboard on it for planting notes, hook a string light over it, or lean it against a wall and use the backrest to keep your tools propped up.
From a stability perspective, the backrest also acts as a structural brace. It ties the rear legs together near the top, preventing the bench from racking side to side. If you are working on uneven ground in the garden, that extra rigidity is worth its weight in gold.
Mistake #4: Misreading the Lower Shelf and Bracing Dimensions
The lower shelf is not just for storage; it is a major structural element that holds the legs square. A common mistake is installing the shelf panels with the good side facing down. Remember, you will look at the underside of this shelf when you are working, and soil will inevitably fall onto it, so the attractive face should face up.
Another tip here is to pre-drill your screw holes, especially into the edges of the shelf boards. This project is made from typical stock plywood or pine, which splits easily near the ends. The free plan diagram shows exactly where the bracing goes, so follow those black lines to avoid splitting the wood and weakening the joint. A countersink bit will make everything flush and professional-looking.
Mistake #5: Rushing the Assembly Order (A Woodworking Plan Nightmare)
Take a good look at the technical drawing before you dive in. You build this bench in a specific order: assemble the two leg frames first, then attach the shelf, and finally add the top slats. If you put the top on first, you will find it nearly impossible to reach inside the frame to screw in the lower shelf brackets.
Follow the diagram like a recipe. Dry fit everything with clamps before securing the joints. This is a fantastic weekend project because it goes together quickly, but spending ten extra minutes to measure the diagonals of the frame will save you an aneurysm later. A square frame is a stable frame.
Smart Material Choices for a Long Lasting Gardening Project
Your local lumber yard will offer a few options, and your choice matters. Cedar and redwood are naturally rot-resistant, making them fantastic for a potting bench that will live outdoors. However, they cost a bit more than regular pine. If you go with pressure-treated lumber, just be aware that it can warp as it dries, so pick straight boards at the store.
No matter what you choose, get a can of exterior wood sealer or paint. The diagram shows the bench in that clean light brown wood color, but you will want to protect it from rain, drips of fertilizer, and muddy gloves. Give the whole thing a coat of sealer before you bring it into the garden.
Putting Your New Potting Bench to Work
Once you have squared away the build, the fun part begins. Set the bench near your garden gate or right beside the compost bin. The 35 1/2 inch depth gives you plenty of room to set up a seed-starting station in the spring and then switch to repotting chores in the fall.
The slatted top is perfect for sifting soil, and the lower shelf will hold your collection of empty pots until you need them. This bench should stay out in the elements all season, so a quick sweep after heavy use is enough to keep it looking great. It is a piece that makes the whole gardening workflow smoother.
Get the Free Diagram and Start Your DIY Potting Bench This Weekend
Building your own potting bench is one of the most practical woodworking projects you can tackle, and it brings a professional touch to your gardening setup. The common mistakes were simply matters of slat spacing, frame assembly, and material selection, and now you know how to avoid every single one of them. That full technical drawing takes the guesswork out of the equation, letting you spend your time on the rewarding part of being outside.
Grab the free plan from the link below, pick up your lumber, and clear a spot on the patio. By Sunday night, you will have a sturdy station that makes every dirty job easier. Happy building, and happy planting.
Leave a Comment