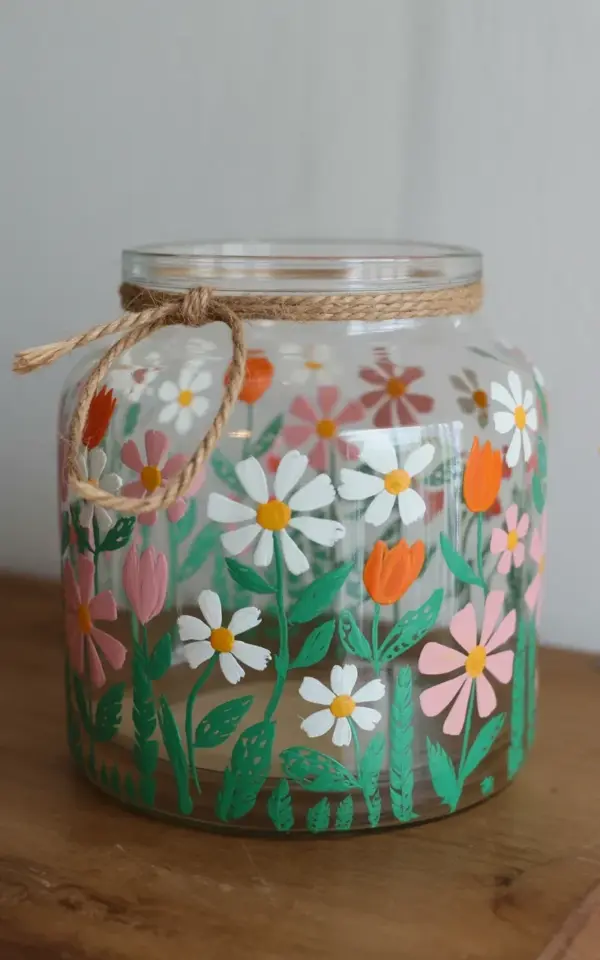
Picture a clear glass jar sitting on a worn wooden counter, catching the afternoon light. Across its surface, white daisies, soft pink cosmos, and bright orange tulips look almost like they were painted by rain. This handpaintedglassjar is beautiful, but it nearly ended up as a smudged mess. The biggest mistake? Sealing it too early. When you seal a hand painted glass jar before the watercolor flowers fully dry, the design drags, blurs, and turns into muddy stains. It is a heartbreak that is completely avoidable with a little patience and a few budget friendly tricks.
Why sealing your hand painted glass jar too soon ruins the design
Watercolor paint on glass behaves differently than on paper. It sits on the surface in thin, translucent layers. If you brush a sealer over those layers while they are still damp, the brush pushes the pigment around. The crisp edges of a daisy petal become a fuzzy blob. The delicate veins on a tulip leaf disappear entirely.
Even if the paint feels dry to the touch, it might not be dry at the core. The center of a thick stroke can stay soft for much longer than you expect. This is especially true in humid weather or cooler rooms. Always give your handpaintedglassjar at least a full hour between layers, and sometimes overnight if you live in a damp climate.
How watercolor flowers need patience to stay crisp and bright
Watercolor flowers on glass look lovely because of their transparency. You see a pale pink cosmos that lets light pass through, next to a solid orange tulip that stands out like a tiny flame. To get that contrast, each flower needs its own timed drying stage. Paint the lightest petals first, let that dry, then add shadows or darker edges.
Rushing the process is where beginners ruin their floral jar. They paint a stem, immediately add another flower on top, and then wonder why the colors bleed together. Instead, paint one small grouping, take a coffee break, and come back. Your future handpaintedglassjar will thank you.
- Paint daisies in white or pale cream, then add a soft yellow center only after the petals dry.
- Layer pink cosmos by painting the base wash, letting it dry, then adding deeper rose strokes on the edges.
- For orange tulips, start with a light orange base, dry it, then add rusty streaks and green leaf highlights.
Affordable supplies for your watercolor floral jar craft
You do not need fancy art store equipment to make a gorgeous glass jar decor piece. A thrift store Mason jar or an old pasta sauce jar works perfectly. The wide mouth of the jar in the photo is ideal because it gives you plenty of room to work and shows off more of the floral pattern.
For a budget friendly paint kit, grab a small set of acrylic paints and a bottle of acrylic medium. A set with white, pinks, oranges, and greens is enough. Use a cheap flat paintbrush and a detail brush. As for the right consistency, mix your acrylic with a little water until it flows like heavily skimmed milk. That gives you the watercolor effect without the high price tag.
Your only other essential is a quality sealer. Look for a spray-on acrylic sealer in the craft aisle. Spray sealers are often cheaper than brush-on ones and they remove the risk of dragging your paint. That small spray can will turn your painted jar into a lasting piece of glassjardecor.
A simple layering method for daisies, cosmos and tulips
Start with a clean, dry jar. Wipe it with rubbing alcohol to remove any oily fingerprints. Then sketch your flower placement lightly with a grease pencil, or just freehand if you are comfortable. The photo shows a scattered, natural pattern that wraps around the whole jar, so there is no need for a perfect grid.
Paint the green leaves first. Stems and leaves benefit from being underneath the flowers so they look like they connect naturally. Let those dry completely. Next, add the tulips and daisies, using a different brush or cleaning your brush well between colors. Then finish with the pink cosmos, which are the lightest and most translucent. Put the jar in a dry spot between each step, and you will see the design bloom.
When all your watercolorflowers are done, leave the jar alone for at least two hours. Do not even poke it with your finger. This is the main habit that separates a crisp floral jar from a blurry one.
The right time to seal your hand painted glass jar and how to do it
Once every layer is truly dry, take your spray sealer outside or into a well ventilated garage. Place the jar on a scrap piece of cardboard. Give it a light, even coat from about ten inches away. Let it dry for thirty minutes, then add a second coat. Two thin coats protect the paint far better than one thick one.
If you prefer a brush-on sealer, use a soft, wide brush and work in long, gentle strokes. Only brush in one direction. Do not go back and forth over the same spot. Wait until you are absolutely sure the paint has cured for a full day, not just a few hours. That extra waiting time makes all the difference.
After sealing, you can add the twine. Wrap a natural rope around the neck of the jar and tie it in a simple bow, just like in the photo. The twine adds a farmhouse feel and also covers up any minor mistakes near the rim.
Customizing your glass jar decor with thrifty touches
This project is a dream for a diycrafts afternoon because you can use items you already own. That twine rope came from a package tie in many cases or a dollar store. You can also add small beads to the bow, or paint the lid with a matching pastel color. Ajar that is meant to hold flowers will look even better with a few dried stems sticking out of the top.
You can make a set of these jars for a wedding centerpiece or a simple kitchen shelf. Put one on a wooden cutting board to recreate the exact look from the photo. Mix and match your own flower choices. Try a pale blue daisy or a deep burgundy tulip. Because the technique is forgiving, you can experiment without spending extra money.
The most important thing is to remember that every layer is its own little project. Your painted jar is not done until it is sealed, and your sealer is only as good as your drying time. Keep your patience and your budget in check, and you will have a beautiful floral jar every single time.
What to do if you already smudged your hand painted glass jar
Do not throw it away. If the smudge is small, let the glass dry completely and then gently paint over the affected area with another thin layer. Match the background color and let that dry before resealing. If the damage is widespread, wipe off the paint with a little rubbing alcohol while it is still fresh and start over. The glass will be clean as new.
I have done this myself many times. The trick is not to panic and not to add more sealer in an attempt to hide the mess. Just clean, wait, and repaint. In a way, that little mistake teaches you the exact rhythm of watercolor on glass.
Now grab a jar, some basic paints, and a roll of twine. Plan your design, paint in layers, and let each one dry completely. With those simple steps, you will avoid the biggest mistake and end up with a hand painted glass jar you are proud to display every single day.
Leave a Comment