The first time I tried bubble art hydrangeas for garden craft, I almost gave up. Not because blowing bubbles is hard, but because I soaked the paper until it sagged. The flowers looked like melting cotton candy, not crisp petals. That mess taught me more than any tutorial did.
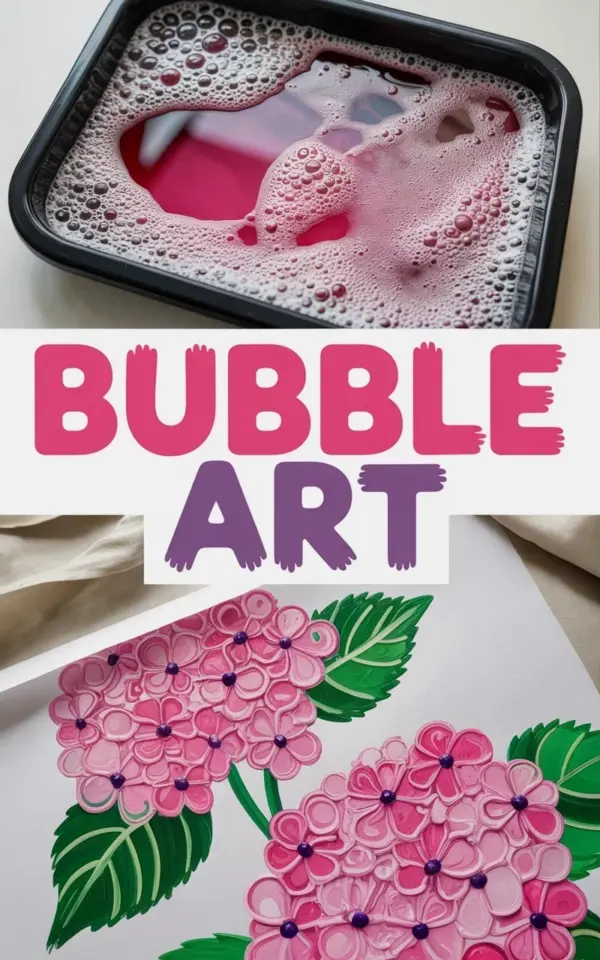
If you saw the photo that goes with this post, you probably noticed the black tray full of pink and white froth. That’s the good stuff. The bubbles should sit on top like whipped cream, not sink into the paper like soup. When you get it right, the texture honestly looks just like real hydrangea petals. Let me walk you through what worked for me, and what I wish someone had told me from the start.
What bubble art hydrangeas actually need from you
Bubble art is simple in theory. You add paint and dish soap to water, blow bubbles into a tray, then press paper on top. The bubbles pop and leave behind these tiny circular prints that cluster together like a flower head. For hydrangeas specifically, you want those circles to stay distinct, not bleed into one big blob.
Here’s the thing nobody mentions: the bubbles are the brush. You have to treat them gently. If you rush, you end up with wet splotches and muddy colors. The finished artwork in the photo shows pink and purple hydrangeas with darker centers. That comes from layering, not from one heavy dunk.
The wet mess mistake and how to avoid it
Overloading the paper with bubble mix is the number one mistake I see in garden craft circles. I did it myself for weeks. I’d load a thick layer of froth onto the tray, press the paper down with too much pressure, and hold it there for several seconds. Every single print came out waterlogged. The colors bled, the paper wrinkled, and the flower shapes just vanished.
So what’s the fix? Keep the froth light. Skim the top layer of bubbles with your paper, don’t push it down. Press for a moment, then lift. You want a quick kiss of bubbles, not a bath. Think of it like stamping a letter, not pressing a flower.
How do you know if you used too much mix? Look at the back of the paper. If it’s see-through or dripping, you’ve overloaded it. Stop there and let it dry before trying again.
Getting the bubble mix to the right consistency
My go-to ratio is one part liquid watercolor, one part dish soap, and two parts water. But ratios only get you so far. The real trick is letting the bubbles sit for a minute before printing. Fresh bubble foam is heavy and full of liquid. After a minute, the top gets lighter and fluffier, like shaving cream.
I use a straw to blow into the tray, but not directly at the edges. Tilt the straw slightly and blow in short puffs. Big mounds of bubbles look impressive, but they collapse into puddles.
- Good mix: bubbles hold their shape for a few seconds before popping
- Bad mix: bubbles disappear instantly, leaving a watery film
- Good print: tiny ring marks, each one separate from its neighbor
- Bad print: a solid colored patch with no definition
- Good paper: watercolor paper or cardstock with some tooth
- Bad paper: printer paper that warps and tears
Also, don’t overdo the dish soap. More soap doesn’t make better bubbles, it makes thinner ones. A squeeze about the size of a coin is plenty for half a cup of water.
Why waiting for each layer to dry changes everything
Patience is the boring part, but it’s also the secret to those crisp flower shapes. If you print one layer and then immediately print another, the wet paper drags the first layer around. The bubbles blend and smear. That’s when you lose the petal effect.
In the photo, the hydrangeas look like they have depth. The pink and purple tones overlap without turning brown. That happened because I waited twenty to thirty minutes between layers. I’d print one set of bubbles, let it dry completely, then add another set on top.
I know waiting feels wasteful. You want to see the final flower now. But half-wet layers just mix into mud, and then you start over anyway. Might as well wait.
Choosing colors that look like real garden hydrangeas
Real hydrangeas aren’t one solid color. They have little variations across each petal, sometimes green near the center, sometimes a deeper pink at the edges. For bubble art, I like to mix two or three related shades in the same tray. For example, a bubble tray with pink, white, and a touch of magenta.
To get the darker centers mentioned in the photo description, I use a small brush to dab a bit of concentrated paint onto the middle of each printed flower after the bubbles dry. That tiny detail makes the cluster read as a single bloom rather than a bunch of random circles.
If you want that purple hydrangea look, try layering blue over pink. The mix of bubble prints gives a believable transition, and it’s much more natural than painting a flat sphere.
What if your paper gets too wet anyway? A rescue tip
Ok so you’ve already made the mistake. The paper is soaked, the colors have bled, and you’re ready to toss it. Don’t. Let the sheet dry completely, then press it flat under a heavy book for a day. You can still cut out the best individual flowers and glue them onto a fresh background.
That rescue method helped me salvage more than one project for my garden craft corner. Honestly, sometimes the cut-and-collage approach looks even better because it adds dimension. But if the paper is so fragile that it tears, just start over. No shame in that.
My favorite supplies and a few warnings
Use thick paper. Watercolor paper is ideal, but heavy cardstock works too. A plastic tray with raised edges helps contain the bubbles. I use an old black takeout container, the kind that always cracks after a few washes. It still smells faintly of sesame oil, but it works perfectly.
For paint, liquid watercolors or acrylic ink are best. Regular tempera tends to be too thick and clog the bubble structure. And please, for the love of craft time, keep a damp cloth nearby. Bubble mix gets sticky fast and it will find your sleeves.
One more warning: don’t blow too hard. I lost my breath and a whole tray of delicate pink foam splattered onto my shirt. That’s when I learned to use a straw with a wider opening, like the kind from a bubble tea shop. It gives you more control and a gentler airflow.
Anyway, that’s the real story of how I stopped ruining bubble art hydrangeas. It took me a few soggy afternoons and one stained shirt to get the point. Now every time I make them for a garden craft project, I hear the same thing from friends: they can’t believe the texture is just bubbles. Save this for your next craft day, and give the froth a little breathing room. You’ll see the difference right away.
Leave a Comment