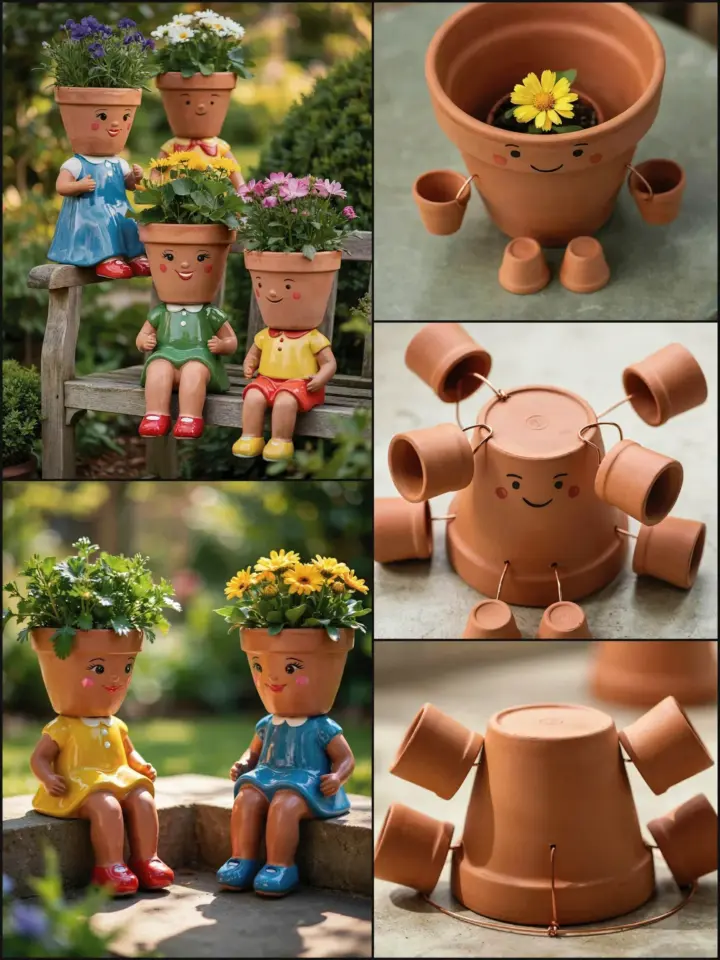
I spotted a set of these in my neighbor’s garden last spring and honestly couldn’t stop smiling. They looked so happy and goofy, like tiny little characters just hanging out by the petunias. I asked how much she paid, and she said maybe three dollars in total. That’s when I knew I had to make my own ClayPotFlowerPeople. This project is a perfect answer to the “I want cute garden decor but I’m broke” dilemma. With just a few simple supplies, you can turn plain terracotta pots into little personalities that make your yard feel alive. And with the rising cost of everything, including outdoor decor at big box stores, making your own is both smarter and more fun.
Why Clay Pot Flower People Fit Right Into This Season’s Garden Trends
If you scroll through garden inspiration boards right now, you’ll notice a shift. People are moving away from mass-produced plastic gnomes and toward handmade, quirky decorations. The 2025 garden trend reports emphasize “whimsical repurposing” and “imperfect handmade charm.” These BudgetGardenCrafts fit both categories perfectly. They cost almost nothing, let you express your own style, and look better when they’re a little lopsided or mismatched. Plus, they’re a great way to use up those extra pots you’ve been hoarding from last year’s failed herb garden (we’ve all been there). Making these flower people also solves the “boring front porch” problem without spending money on expensive planters that crack in the sun.
Gather Your Supplies: Mostly Cheap, Mostly Recycled
You don’t need a trip to the craft store for this. I bet you already have half of these things sitting in a drawer or a garage box. Here is my honest list of what works best, based on trial and error:
- Clay pots in various sizes (a 4-inch pot for the body, a 2-inch pot for the head works well)
- Acrylic craft paint in outdoor-grade formulas (or regular acrylic with a clear sealer)
- Paintbrushes and a small sponge for even coverage
- Wooden beads for noses or buttons (optional, but adds great character)
- Hot glue gun and glue sticks (go for the high-temp kind for outdoor durability)
- Jute twine, yarn, or dried moss for hair
- Small twigs, buttons, or leftover ribbon for accessories
- All-purpose outdoor sealer (spray or brush-on, to protect your paint from rain)
I’ve found that thrift stores often have bags of mismatched clay pots for less than a dollar. Same with wooden beads from old jewelry. This is a true DIYGardenDecor project where the hunt for supplies is half the fun.
Step 1: Clean and Prep Your Pots for a Smooth Finish
New terracotta pots usually have a dusty surface that won’t hold paint well. Give them a quick wash with soapy water and let them dry completely. If you’re using old pots that have dirt or mineral stains, scrub them with a stiff brush. Once they’re dry, wipe them down with rubbing alcohol to remove any greasy residue. That extra step makes a noticeable difference in how the paint sticks. Some people skip priming, but I recommend a thin coat of matte white or gray spray primer. It helps the colors pop and prevents the terracotta from sucking up too much paint. This way you won’t need three coats just to cover the orange clay.
Step 2: Paint the Face and Body with Weather-Smart Colors
Now you get to decide the mood of your flower people. I like to keep the body simple, maybe a solid pastel or a bold primary color. For the face, paint a round area on the smaller pot (the head) with a skin tone like beige, peach, or even a soft gray for a more rustic look. Then add eyes, a smile, and rosy cheeks. Use small dotting motions for the eyes. A toothpick works better than a brush for tiny details. To make them last outdoors, use paint labeled “outdoor” or “weatherproof.” I’ve had good results with regular acrylic sealed with a clear matte spray. Pro tip: let each color dry fully before adding the next, or you’ll end up with a blurry smile that looks sad instead of cheerful.
Step 3: Give Them Hair, Hats, and Silly Accessories
This is where the personality really comes through. For hair, I glue on short pieces of jute twine or unraveled yarn in colors like mustard yellow or rusty orange. You can also use dried moss to make a natural-looking toupee. If you want a hat, glue on a small acorn cap or a tiny terracotta saucer turned upside down. Some of my favorite details include a little ribbon bow tie, a pair of tiny twig arms glued to the sides, or a button necklace. Keep it light: these are whimsical garden pals, not a wedding cake. The more imperfect they look, the more charm they have.
Step 4: Assemble the Flower People with Solid Glue
Once all the paint and accessories are dry, it’s time to stack. Place the smaller pot upside down on top of the larger one. The flat bottom of the small pot becomes the face area, and the rim of the large pot acts like a collar. Use a generous amount of hot glue around the rim of the bottom pot, then press the head on and hold for about twenty seconds. For extra stability, you can also glue a wooden dowel inside the pots, but I’ve found that hot glue alone holds well as long as you don’t treat them like footballs. If you want them to stand up straight, make sure the bottom pot is level. A little wobble can be cute, but a lot of wobble will drive you crazy when you place them in the garden.
Step 5: Plant or Display – Make Them Last Through Rain and Sun
Now you have a finished flower person. You can simply set them on a shelf or doorstep, or you can turn them into living planters. If you want to plant something, fill the top (the upside-down head pot) with soil and add a small succulent or a trailing vine like creeping Jenny. But here’s a reality check: because the head is glued to the body, you can’t water from the bottom. So either use plants that like dry conditions, or drill a small drainage hole through the bottom of the head pot before assembly. Another option is to place a small plastic pot inside the head pot and hide the rim with moss. For a no-water approach, stick a fake flower or a colorful silk bloom into the top hole. That way you get the flower person look without any maintenance. This is the core of OutdoorCrafts that actually survive a season of weather.
Mix and Match for a Whole Garden Family
Once you make one, you’ll want to make a whole crew. Try using different pot sizes: a tall skinny pot for the body makes a lanky character, while a squat bulb pot creates a chubby one. Paint them in rainbow colors or keep them all neutral for a more cohesive look. You can also add little signs or tiny flags they hold between two glued-on twig arms. I’ve seen people glue on tiny sunglasses or even a little mask for a funny touch. The best part is that each one costs maybe 50 cents to make, so you can afford to experiment. And if a paint job goes wrong, just paint over it. Nothing is precious here, which is the whole point of ClayPotCrafts.
Give this project a try this weekend, even if you only have one pot and some leftover paint. Start with a simple smiling face and see where your imagination takes you. I promise you’ll walk into your garden afterward and actually grin at the silly little figure you made. If you create a set, I’d love to hear about it. Drop a comment or tag your photos so the rest of us can smile too.
#ClayPotFlowerPeople #BudgetGardenCrafts #DIYGardenDecor #OutdoorCrafts #ClayPotCrafts
Leave a Comment