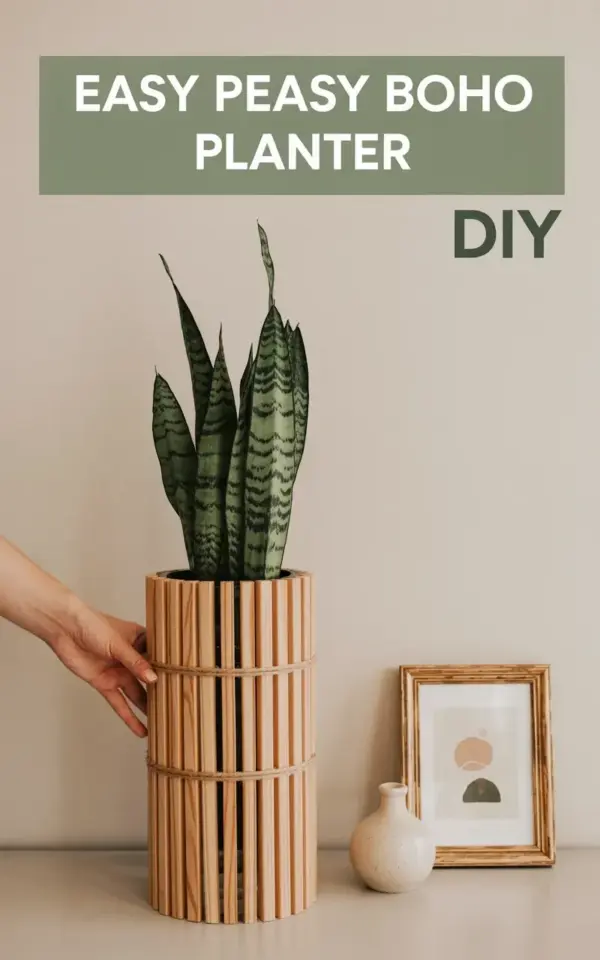
Why the Snake Plant is the Perfect Match for a Wooden Slat Planter
When I first spotted this DIY boho planter with a snake plant on Pinterest, I knew I had to build one for myself. The combination of light wooden slats arranged vertically around a tall cylindrical shape feels both modern and grounded. And the snake plant? It’s the unsung hero of low-maintenance greenery. Those dark green, fleshy leaves add just enough structure to balance the airy slat work without demanding constant watering or sunlight. I’ve killed more succulents than I’d like to admit, but my snake plant has survived weeks of neglect and still looks crisp. That’s the kind of plant I can get behind.
The planter in the photo is ridiculously simple to make. You only need a few wooden slats, a base cylinder (I used a cheap foam craft tube), some glue, and about an hour. The vertical slats create natural texture that makes the whole piece feel way more expensive than it actually is. If you’re after minimalist decor that doesn’t require a big budget or a green thumb, this is your weekend project.
Choosing Your Wooden Slats: Cost and Texture Matter
For this build, I grabbed a bundle of pre-cut wooden slats from the hardware store. They were about 1 inch wide and 18 inches long, which worked perfectly for the height of my planter. I wanted that light, natural wood tone you see in the photo – not too yellow, not too grey. Cedar or pine works well, just avoid anything with a heavy stain if you’re going for the boho look.
Texture is key here. The slats have a slight roughness that catches the light and adds visual interest. If your slats feel splintery, give them a quick sand with 120-grit paper. I skipped that step once and regretted it when I brushed my hand against the side. Save yourself the scratch.
- Width: 1 to 1.5 inches for a balanced look
- Length: At least as tall as your cylinder (plus a little extra)
- Wood type: Cedar, pine, or even bamboo
- Finish: Leave raw or apply a clear matte sealant if you plan to place it near a window with direct sun
The bundle of slats cost me under $10, which is honestly less than a single decorative pot from a home goods store. Worth every penny.
Step by Step: Assembling the Cylindrical Boho Planter
Once you have your slats and a cylindrical base (I used a empty coffee can wrapped in craft paper), the process is straightforward. Arrange the slats vertically around the cylinder, leaving a small gap between each one. That gap lets the shape breathe and creates that lovely slatted shadow effect.
Use a hot glue gun to attach each slat to the cylinder. Work your way around, pressing firmly for a few seconds. I found it easiest to glue three slats at a time, then rotate the cylinder. The hand reaching in from the left side of the photo? That’s me checking that the slats are evenly spaced and snug. You can use a small piece of cardboard as a spacer to keep gaps consistent.
Once all slats are attached, let the glue set for about 10 minutes. Then slide a plastic pot (with drainage holes) inside the cylinder. The snake plant should already be in that pot, so you don’t have to repot it. This way, you can water normally without soaking the wood. Smart, right?
Adding the Sage Green Banner Detail for That Pinterest Look
The photo shows a sage green rectangular banner at the top with white text that reads “Easy Peasy Boho Planter” and “DIY” in green below it. That little banner is what takes this from a simple wooden cylinder to a styled decor piece. I printed the letters on plain white cardstock, cut them out, and glued them onto a strip of sage green craft paper.
You can also buy pre-made banner sheets at a craft store. Just make sure the green is muted – sage or olive works best with the natural wood tones. I attached the banner using double-sided tape near the top rim of the planter. It hangs just enough to be visible but doesn’t overpower the plant. If you want to skip the banner, the planter still looks great on its own. But for that exact Pinterest moment, the banner is the cherry on top.
Styling Your DIY Planter: Where to Place It for Maximum Impact
This cylindrical planter works in a bunch of spots. I have mine on a light-colored side table in my living room, exactly like the photo shows. The vertical slats draw the eye upward, making the snake plant feel taller and the room feel more spacious. It also looks good on a bookshelf or a low credenza, especially if you group it with a stack of neutral-toned books or a small woven tray.
Because the planter is lightweight (wood slats plus a plastic pot), you can move it around easily. I’ve tried it on the floor next to a floor lamp, and I liked how the shadows played across the slats in the evening. Just avoid placing it directly in harsh sunlight for hours – the wood might dry out and crack over time. Morning sun is fine.
4 Practical Tips to Keep Your Snake Plant Thriving (Even if You Forget)
Snake plants are famous for surviving neglect, but they do appreciate a little care. Here’s what I’ve learned from my own experience.
- Water sparingly. Once every two to three weeks is plenty. Let the soil dry out completely between waterings. Overwatering is the number one killer.
- Use well-draining soil. A cactus or succulent mix works best. Avoid heavy potting soil that stays wet.
- Dust the leaves. Every few weeks, wipe the dark green leaves with a damp cloth. Dust blocks light absorption and makes the plant look dull.
- Rotate the pot. If you notice the leaves leaning toward a window, give the planter a quarter turn each month. This keeps the growth even.
I’ve followed these tips for over a year now, and my snake plant has even produced a few pups (baby plants) at the base. That’s a win in my book.
Why This Project Costs Less Than You Think
I’m not a big spender on decor, so I always look for projects that give me a high-end look for pocket change. This DIY boho planter costs around $12 total if you already have a glue gun and a snake plant. The slats are under $10, the cylinder base is free (reuse a can or a plastic container), and the banner supplies are maybe $2.
Compare that to buying a similar wooden planter from a boutique – those can run $40 to $80 easily. Plus, you get the satisfaction of building it yourself and the ability to customize the height and slat spacing. If you want a taller planter, just use longer slats and a taller cylinder. The same principle applies.
I’d say this is the perfect weekend craft for anyone who wants to upgrade their space without blowing the budget. Save this idea for your next project day, and you’ll have a fresh piece of minimalist decor ready in under two hours.
#DIYbohoplanter #snakeplant #woodenplanter #minimalistdecor #easydiy
Leave a Comment