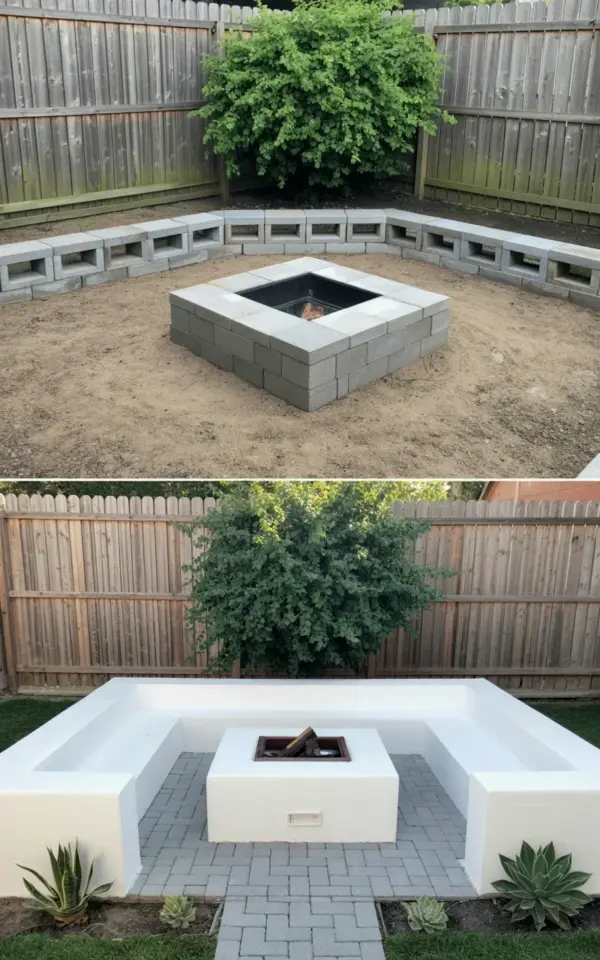
You know that one corner of your yard you keep ignoring? The fire pit area that looks more like a dirt patch with a few sad concrete blocks stacked in a square? Yeah, I’m talking about that same one in the photo above, the one with the big leafy bush and a wooden fence looming behind it. We finally tackled ours. And honestly, a firepitmakeover with just paint and pavers turned that neglected spot into something we actually want to hang out in. Not gonna lie, I was skeptical at first. But seeing the after shot? That bright white against the gray pavers and those tiny succulents? Totally worth the weekend sweat.
Refreshing an Old Cinder Block Fire Pit – Why Bother?
Look, cinder blocks are cheap and they work. But they’re also kind of ugly. Gray, rough, and they soak up every bit of dirt and ash. Here’s the thing: you don’t need to rip them out and start over. A little paint does the heavy lifting. We didn’t want a full rebuild, just something that didn’t look like a construction site leftover. Painting the blocks white solved that instantly. It also made the whole fire pit zone feel cleaner and brighter, even before we added the walkway. If you’ve got a square fire pit made from those standard concrete blocks, you’re halfway to a backyard upgrade already.
Before Our Backyard Renovation – A Dirt Patch With Potential
Our before photo shows exactly what we were dealing with. A square fire pit, center stage, surrounded by nothing but hard-packed dirt and the occasional weed. The cinder blocks were that generic light gray. The wooden fence behind looked fine but the whole area just felt unfinished. And that big green bush? It’s a rhododendron (or maybe a giant azalea, I’m not a plant expert). It was swallowing the whole corner. Honestly, we almost gave up. But then I thought: paint is cheap. A few gray pavers can’t cost that much. What’s the worst that could happen? So we grabbed a brush and a level and just went for it.
How to Paint Concrete Blocks for a Fire Pit – The Real Steps
I’ll be straight with you: painting cinder blocks is messy but not complicated. We used a masonry paint (the kind that says “for concrete and brick” on the label). One gallon did our entire square pit, about 24 blocks total, with a little left over for touch-ups. You’ll want a stiff brush for the rough texture. Rollers work for the flat faces but those crevices need handwork. And please, use a primer if your blocks are unsealed. Ours were porous and drank the first coat like a thirsty camel. Two coats did the trick. Pro tip: lay down a tarp unless you want white speckles on your grass forever. I may have accidentally painted a stray ant. Sorry, little guy.
- Clean first. Scrub off dirt and loose mortar with a wire brush and hose.
- Prime if needed. A bonding primer stops the paint from peeling.
- Paint in thin coats. Two thin coats stick better than one thick goopy layer.
- Let it cure. Give it a full 24 hours before fire use. Seriously. Don’t rush it.
Easy Paver Walkway for Fire Pit Area – No Experience Needed
Adding a walkway solves two problems: it keeps your shoes clean and defines the space. We bought gray concrete pavers from a big-box store, the kind that lock together with little tabs. Ok so, we didn’t do a full patio. Just a narrow path leading from the backyard gate to the fire pit, then curving around one side. That’s it. You don’t need to dig six inches down for a low-traffic walkway. We scraped away the top layer of dirt, laid down some landscape fabric (to stop weeds), and poured a thin layer of paver sand. Then we placed the pavers, tapped them level with a rubber mallet, and swept more sand into the gaps. Annoying but worth it. The gray color matches the white blocks surprisingly well. Who knew?
Fire Pit Area Decor Ideas With Succulents – The Tiny Game Changers
Don’t overlook the plants. We’re not talking about a massive flower bed. Just a few small succulent pots tucked between the pavers and along the edge of the fire pit. They’re low maintenance, they don’t drop leaves everywhere, and they add that little bit of life that ties the whole thing together. I placed one right where the walkway meets the pit, like a tiny welcome sign. Another sits on the flat top of a painted block. Honestly, they cost me less than fifteen bucks total. And they make the after photo look ten times better than the before. If you’re worried about kids or dogs knocking them over, use heavy ceramic pots and tuck them tight between stones.
Before and After – What Actually Changed
The after photo shows the same square fire pit, same wooden fence, same big leafy bush. But now the blocks are bright white. The gray pavers create a clear path where dirt used to be. And those little succulents? They’re scattered like punctuation marks. It’s not a total landscape overhaul. It’s just a cleaner, more intentional version of what we already had. And that’s the point. You don’t need to install a paver patio or hire a crew. Paint and pavers and a few plants. That’s the whole list. The before dirt patch is gone. The after feels like a place you’d actually sit with a drink and watch the flames.
So if you’ve got an old cinder block fire pit sitting in a dusty corner of your yard, grab a can of masonry paint and a bag of pavers. Not gonna lie, your back might ache a little from all the bending. But the next time you’re roasting marshmallows, you’ll look around and think, “Huh. I did that.” Got a fire pit makeover of your own? Drop a photo or a question below. I’d love to see what colors you pick.
#firepitmakeover #backyardrenovation #cinderblock #outdoorliving #diymakeover
Leave a Comment