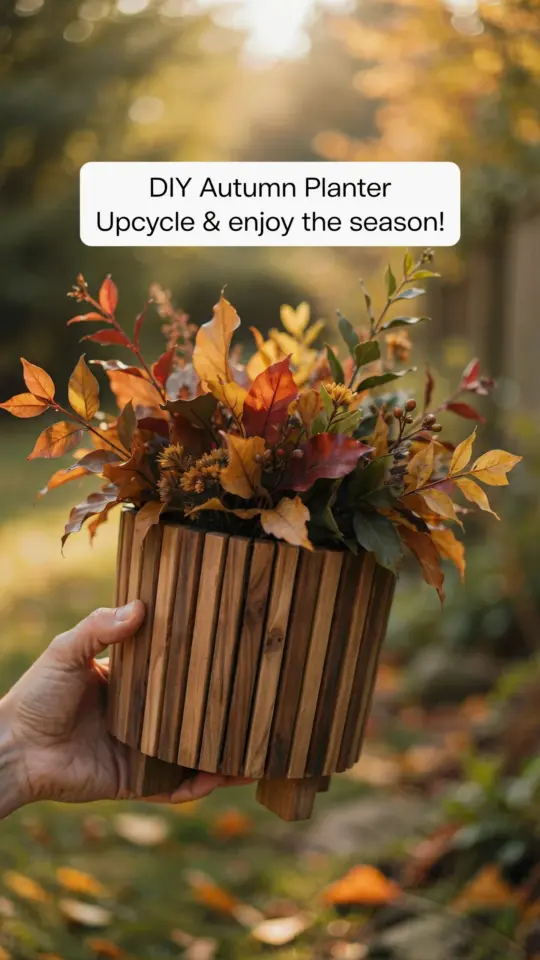
This DIY fluted plant pot has honestly been on my mind all season. The weather turned, the light changed, and my windowsill suddenly looked a little too plain. So I grabbed an old canister from the pantry, a pack of square wood dowels, and a glue gun. The result looks like one of those boutique planters that somehow costs forty dollars, except it cost me an afternoon and a few supplies.
Ok so here’s the thing about fluted planters. They’re everywhere in home decor right now, but they don’t have to be bought. You can wrap almost any straight-sided container in wood dowels and get that same ribbed, cozy texture for a fraction of the price. Plus you get to call it an upcycled planter, which always sounds more interesting than it really is.
Why I used square dowels instead of round ones
Round dowels look cute, but they roll away from you. They also only touch the canister at a single point, which makes gluing them a bit of a headache. Square dowels sit flat against the container, so they stay put while the hot glue dries.
The square shape also gives you a more modern fluted aesthetic. Think of those clean, slim groove lines on expensive vases, not the chunky rustic look you’d get with half-round molding. I bought a bundle of 1/4 inch square dowels from the craft store, and it was plenty for a coffee canister sized planter.
Choosing the right canister for this project
Your container matters more than you think. I used a big tomato can from the bulk store, one of those giant things they sell in the food service aisle. It still smelled faintly of tomatoes when I cleaned it, and honestly, my planter now smells a little like tomato whenever the sun blasts it. Not a bad thing. Just a weird thing.
Here’s what to look for in a canister:
- A straight, smooth body with no ridges or embossed letters that will show through.
- A can opener that leaves a clean rim. The jagged kind will ruin the whole vibe.
- Something that feels heavy enough not to tip over once you add soil. A slim soup can might work for a small succulent, but it will be a disaster with a tall plant.
- And if you find an old olive oil tin with a pretty label, save it for another project. This project works best when the label is completely removed or covered.
Wash the canister with warm soapy water, peel off any paper, and dry it thoroughly. If there’s sticky residue, hit it with a bit of rubbing alcohol or a citrus cleaner. That one step saves you so much frustration later.
How to wrap the dowels without losing your mind
The trick is not to freehand the whole thing. I tried that the first time. My dowels went crooked around the middle, and I had to peel all of them off and start over. Not a fun moment.
Instead, cut a long strip of paper and wrap it around the bottom of the canister. Mark where it overlaps, then use that as a length guide for your dowels. Cut each dowel just a touch taller than your canister if you want the planter to look like it has a little lip. I like mine flush with the rim, so I measured carefully and used fine grit sandpaper to smooth every end.
Now the actual wrapping. Work in small sections, run a bead of hot glue down the center of a dowel, and press it against the canister. Hold it for a few seconds. Then move to the next one. Make sure the edges of each dowel touch the edges of the last one. If a gap appears, just adjust the next piece. The glue sets fast enough that you’ll know within a minute whether you nailed it.
The bottom edge is where things get messy if you’re not careful. Hot glue tends to seep out and create little strings. I keep a wooden skewer nearby to poke those away before they dry. Also, place a piece of scrap cardboard under the canister while you work. That way you don’t glue your project to the table, which I have definitely done. Twice.
The finishing step that makes it look expensive
A raw wood planter can look great and then get water stains if you’re not careful. I sealed mine with a matte water-based polyurethane. Two thin coats, allowing each one to dry completely. The matte finish keeps the wood texture visible while protecting against splashes and damp soil.
Another little thing: add felt pads or cork dots to the bottom. Let me tell you, nobody wants to drag an uncoated metal canister with wood sides across a wooden shelf. The scraaaaaape sound is awful. A few dollars worth of adhesive cork pads solves that problem and keeps your furniture in one piece.
If you hate sealing things, you can skip it for a purely decorative pot. Put a smaller plastic nursery pot inside instead of planting directly in your new planter. That actually works better anyway because you can swap plants easily when you get bored.
Ways to style your fluted planter on a shelf or windowsill
I put mine on the edge of a kitchen windowsill next to a stack of old cookbooks. The ribbed texture adds just enough visual interest that you don’t need anything else. Pair it with a trailing plant like pothos or string of hearts to soften the vertical lines.
You can also group it with other planters in different heights. Put it on a riser or an upside down ceramic bowl. Mix in a candle and a small stack of coasters. The key is not to crowd it. Fluted texture wants a bit of breathing room to be appreciated.
For a cozy seasonal vibe, tuck some dried eucalyptus branches into the soil around your plant. Or switch the plant out for bare twigs in winter, which sounds sad but honestly looks beautiful and sculptural against the wood.
What to do with leftover dowels
You’ll almost certainly have extra dowels after this project. Don’t throw them away. They’re perfect for a small wooden flag, a trivet, or even a pencil holder. I used my leftovers to make a matching little pot for a succulent. Same technique, just a smaller can.
If you have short odd bits, glue them into little blocks and use them as napkin rings. That’s a bit fiddly, but it makes a cute gift. Or you can cut them to fit a picture frame and make a mini fluted frame for a photo of your cat. Not that I did that. Ok, I did do that.
Honestly the best thing about this project is how easy it is to scale. A tall canister makes a statement floor planter. A tiny tin makes a desktop pencil holder. You can knock out three in one afternoon and give them all as housewarming gifts. If you’re into craft projects, this is one of those rare ones that actually takes less time than you expect.
So next time you finish a can of soup or veggies, give it a second look. Grab some square dowels and a glue gun, and make yourself a fluted planter that looks far more expensive than it is. I think you’ll be surprised how much you love it. And if you make one, tag me or leave a comment with how yours turned out, because honestly, I love seeing what other people come up with.
#diyplantpot #flutedplanter #upcycledplanter #wooddowelcraft #gardencrafts
Leave a Comment