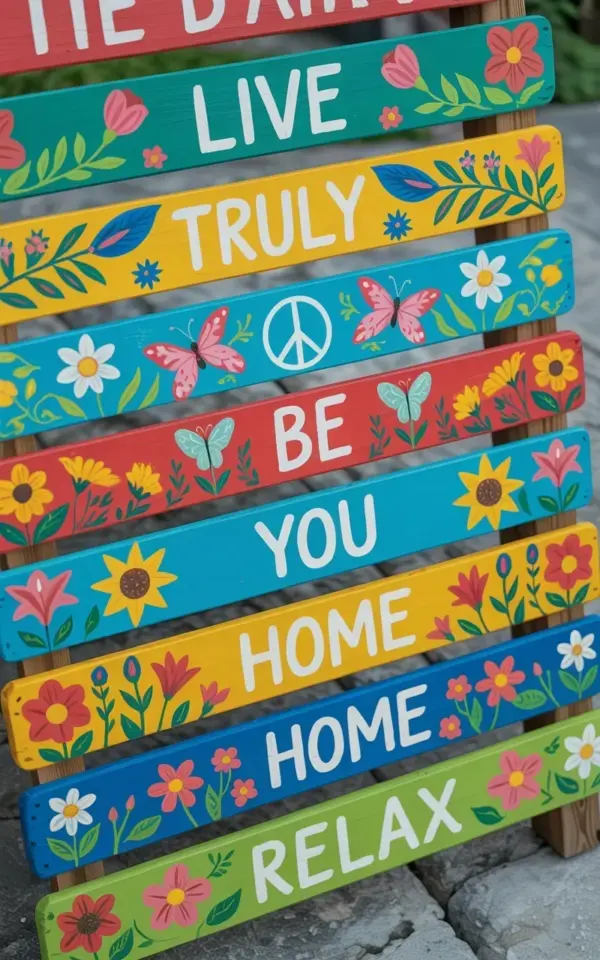
If you’ve ever looked at a pile of leftover fence slats and thought they’d make cute outdoor signs, you’re right. Painted fence slat garden art is one of those projects that looks way harder than it actually is. But here’s the thing: most people mess it up in the exact same ways. I’ve made these signs for my own backyard and as gifts, and I’ve learned what not to do the hard way. Not gonna lie, my first attempt looked like a kindergartner’s art project after a week of rain.
The biggest mistake: skipping the prep work on your fence slats
Look, fence slats come from a hardware store, but they’re still raw wood. They’ve been sitting in a pile, getting dusty, maybe a little damp. If you paint straight onto that, the paint will peel faster than you can say “spring garden tour.”
Here’s what I do now: sand every slat lightly with 120-grit paper. Just enough to knock off the fuzz and any splinters. Then wipe them down with a tack cloth or an old rag dampened with rubbing alcohol. It takes ten minutes, and it saves you the heartbreak of watching your beautiful design bubble up in the sun.
One time I skipped this step because I was in a hurry. The result? Chipped paint on three out of five signs. My friend still hung hers, but every time I saw it, I cringed. Don’t be like me.
Choosing the wrong paint for outdoor fence signs
Not all craft paint is created equal. Cheap acrylic from a dollar store works for indoor frames, but for outdoor garden signs, you need something that handles weather and UV rays. I’ve had good luck with exterior acrylic latex paint, but honestly, even a decent multi-surface craft paint works if you seal it properly.
The photo that inspired this post shows slats in turquoise, yellow, red, blue, and lime green. Those bright colors are exactly what you want. Just make sure you buy paint with a satin or semi-gloss finish. Flat paint absorbs moisture and looks dull after a season.
Here’s a quick checklist before you open the paint can:
- Check the label for “exterior” or “outdoor” rating. It makes a difference.
- Buy a small primer. Trust me, it’s worth the extra $6.
- Pick a brush with synthetic bristles for acrylic. Natural bristles leave streaks.
- Get a foam roller for the background. It gives you a smooth, even base.
Overcomplicating the design on a narrow slat
Fence slats are long and skinny. That’s their charm, but it also means you can’t cram a full landscape painting onto them. I see people trying to paint a detailed sunflower with a stem and leaves and a butterfly and a quote, and it just looks cluttered.
Instead, lean into the simplicity. The painted slats in the inspiration photo work because each one has a single focal point. One has a peace symbol. Another has a sunflower with a few petals. The word “RELAX” sits on its own with a tiny butterfly. That’s it. Don’t add more.
Think of it this way: the slat is a greeting card, not a billboard. Choose one flower or one butterfly or one word. If you really want multiple elements, space them out vertically. A small daisy at the top and a short word like “BE” at the bottom can look lovely. But resist the urge to fill every inch.
Freehand lettering that looks shaky? Here’s the fix
Let me guess. You want to paint the word “LIVE” on a slat, but your hand wobbles and your letters look like they’re having a seizure. I’ve been there. My “L” always ends up lopsided.
The easiest fix is to print the word on regular paper, then flip it over and shade the back with a pencil. Tape the paper to the slat, trace over the letters, and you’ll get a perfect outline to paint in. Nobody talks about this trick, but it’s a game changer.
Or just use painter’s tape and a stencil. For longer phrases like “TRULY” or “HOME”, stencils give you crisp, clean letters. You can buy a cheap letter stencil set at a craft store. The key is to hold the stencil flat and use a gentle dabbing motion instead of a sweeping brush stroke. That prevents paint from bleeding under the edges.
And if you want that slightly imperfect, hand-painted look? Then forget all the tricks and just go slow. Use a small round brush and build up the letters in two thin coats. A little wobble adds character, honestly.
Forgetting to seal your finished garden art
You’ve painted the flowers. You’ve lettered the words. You’re feeling proud. But if you don’t seal it, that beauty is going to fade within a few months. The sun is brutal, and rain is unapologetic.
I learned this when my first sign lost its bright red poppies after one summer. They turned pink, then washed out completely. The wood also started to gray where the paint had cracked. So now I always follow up with a clear outdoor sealer.
My go-to is a water-based polyurethane in a spray can. It goes on easy, doesn’t yellow, and dries quickly. You need two coats, maybe three if you’re feeling extra protective. Let each coat dry fully before touching it, and spray them outside or in a well-ventilated garage. The smell is no joke.
Hanging your sign before it’s fully cured
Ok so you’ve sealed everything and you’re excited. You want to hang the sign right now. Wait. Just wait. If you hang it while the sealer is still tacky, you’ll get dust stuck to the surface, or worse, the sign will slide and smear.
Check the can for the cure time. Most sealers are dry to the touch in a couple of hours, but they need a full day to harden correctly. I know this because I once hung a sign in the morning, felt the back and it seemed dry, and then a bird landed on it. There’s a permanent claw mark in the paint now. That’s my weird little reminder to be patient.
Give the slats at least 24 hours, and if you live somewhere humid, make it 48. The extra day is worth it for clean edges and a finish that lasts for years.
Speaking of lasting, check on your signs after a few months. If you used leftover wood, some slats are more prone to warping than others. That’s normal. Just bring them inside during heavy storms or intense heat waves. They’ll thank you.
Painted fence slat garden art is genuinely one of the most forgiving DIY projects out there. You can paint a peace symbol on a turquoise slat with a butterfly and call it done. Or you can go all out with pink lilies and the word “YOU” in bold letters. Either way, you’ll have something personal that adds color to any backyard or patio. Save this idea for your next free afternoon, grab a few slats, and start painting. I promise you’ll surprise yourself with what you can make.
#paintedfenceslats #diygardenart #fencesigns #inspirationalgarden #flowerpainting
Leave a Comment