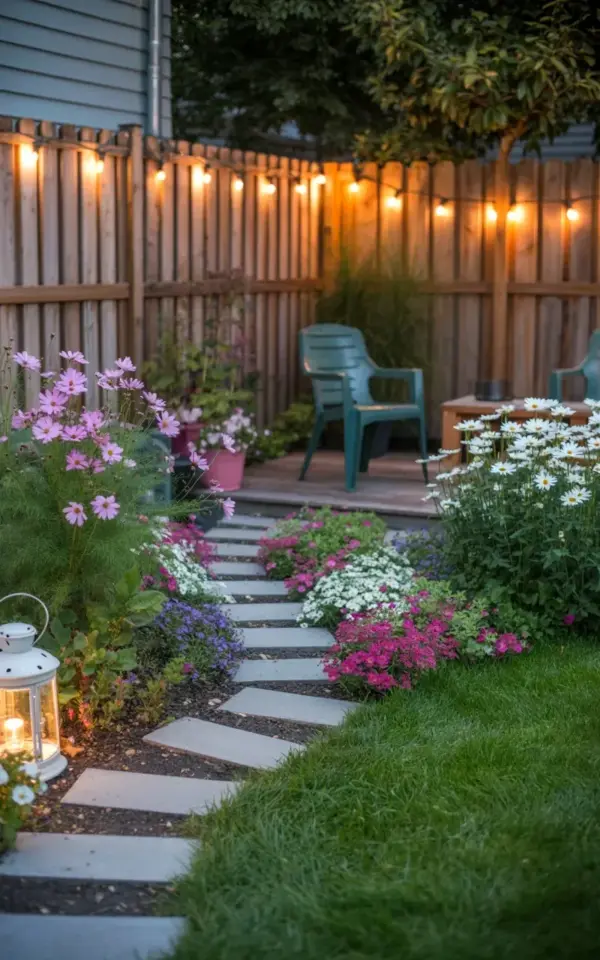
Ok so let me cut to the chase. The biggest mistake I see in garden pathway design is making them too straight and boring. You know those ruler-straight concrete slabs that just shoot from your patio to the shed like they’re trying to set a land speed record? Yeah, those. Look, a garden pathway should feel like a gentle invitation, not a marching order. That’s why I love the curved stone path idea from the Pinterest photo I keep staring at: a lazy arc of flat gray stones through a cloud of pink cosmos and white daisies, with string lights overhead and a teal chair waiting at the end. Honestly, that one curve changes everything. It makes you want to walk it slow. It makes the whole backyard feel bigger, softer, more alive. So let’s talk about why you should ditch the straight line and how to build a curved path that actually works.
Why straight paths kill the vibe in your backyard (and what to do instead)
Straight paths are efficient. They get you from A to B fast. But unless you’re running from a bear, when do you need efficiency in your garden? Never. Not once. A straight path forces your eye to the finish line and ignores everything in between. Your flowers become blurry background noise. Your stepping stones look like a government sidewalk. It’s boring, honestly. A curved path, on the other hand, slows you down. It creates a sense of discovery. What’s around that bend? Oh, it’s the cosmos patch. Oh, it’s the string light glow. Here’s the thing: curves also make a small yard feel larger because you can’t see the whole thing at once. Your brain has to process it bit by bit. That’s good. That’s the whole point of a garden pathway, not just to walk on, but to experience.
And a quick personal aside: I once laid a straight path of pavers in my first rental garden. It looked like a landing strip. Ants used it as a highway. I tripped on the same loose stone every single morning because my foot knew exactly where to land. Never again.
Quick checklist before you start your curve:
- Mark the path with a garden hose first. Move it around. Live with it for a day.
- Aim for a gentle S-curve, not a snake-like zigzag. Too many tight bends look frantic.
- Keep the curve wide enough for two people to walk side by side (at least 3 feet).
- Check the curve from your house windows. The view matters.
The science of a gentle curve: how to make your stone garden path feel natural
Not all curves are created equal. A sharp turn feels forced and weird. A super wide, lazy arc feels like the path grew there on its own. That’s the goal. I’m talking about a bend that maybe shifts 2 or 3 feet over a 20-foot run. Subtle. Elegant. When you look at that photo with the pink cosmos and the string lights, notice how the path doesn’t swing wildly. It just drifts a little to the left, then settles back. That’s the sweet spot. To get this right, you have to walk the path as you lay stones. Place a few, step back, squint. Move one stone. Walk it again. It’s annoying but worth it. A stone garden path that looks natural didn’t happen by accident. It happened because someone cared enough to adjust the third stone three times.
And please, for the love of all things garden, don’t use perfect pre-cut rectangular pavers for a curve. They fight the shape. Use irregular flagstone or large flat fieldstones. The organic edges will follow your curve without screaming for attention. Ok so here’s another thing: lay the stones in a staggered pattern, not in a line. It feels more like stepping stones across a stream, less like a conveyor belt.
Plant partners: pink cosmos and white daisies (and what to swap if they’re not your thing)
That photo has pink cosmos on one side and white daisies on the other. It’s a killer combination. Cosmos are tall and airy, they dance in the breeze. Daisies are lower and mounded, they soften the path edge without blocking it. Together they create this cottage garden vibe that makes the stone garden path feel like it’s always been there. But here’s the seasonal thing: cosmos and daisies are summer bloomers. If you want this look in early spring or fall, swap them out. Try tulips in April and then switch to zinnias for August. Or use lavender if you prefer a more modern, drought-tolerant look. The key is keeping plants low enough that they don’t swallow the stones. You want the path to be visible, not a guessing game. Nothing worse than stepping on a hidden stone and twisting your ankle. Not gonna lie, I’ve done it. Three times. Once in espadrilles. It’s embarrassing.
Also, think about scent. Cosmos barely smell. Daisies don’t either. If you want fragrance as you walk, plant dianthus or catmint along the edges. They’re just as pretty and way more fragrant. You’ll catch a whiff every time you brush past. That’s the kind of detail that makes a backyard path feel like a real escape.
String lights: the secret to evening strolls (and where to hang them)
Look at that photo again. The string lights aren’t just thrown over a tree branch. They’re hung across the top of the frame, draping in gentle swoops between points. This creates a ceiling effect. It defines the space without walls. For a garden pathway, string lights do two things: they guide your eye along the curve after dark, and they make the whole garden feel like a party, even when you’re the only person there. Honest truth: I put up string lights in my backyard in March and didn’t take them down until November. Zero regrets. They just live there now. They make every evening walk feel intentional.
Where to hang them? If you have a wooden fence like in the photo, attach eye hooks to the top rail and string your lights between them. No fence? Use tall stakes, shepherd’s hooks, or even your house eaves. Spacing the hooks about 6 to 8 feet apart gives you that nice dip between supports. And get the warm white bulbs, not the cool white ones. Warm light makes the cosmos look pinker, the daisies whiter, and your face less zombie. Trust me.
Stone spacing secrets for a safe and pretty walkway
Here’s a mistake I see all the time in stone garden path designs: people space the stones too far apart, or too close together. Too far and you’re doing a high jump every step. Too close and you might as well have a solid patio. The ideal gap is one to two inches between stones. That’s enough for low-growing thyme or moss to fill in, but not enough for a heel to get stuck. And make sure the stones are level. Seriously. Level them with sand as you go. A wobbly stone is not charming. It’s a lawsuit waiting to happen. Or at least a spilled wine glass on a summer evening. I speak from experience. My mother-in-law’s ankle still twitches when she remembers my first path. Anyway, keep the walkable surface consistent. If you alternate large and small stones, make sure the large ones are stable. Small ones can be grouped in pairs. And always, always test the path in bare feet before you call it done. If it hurts, fix it.
A teal chair moment: adding a focal point to your garden pathway
In the photo there’s a teal chair against the fence. It’s not the main event, but it matters. That chair gives the path a destination. You walk the curve, you end up at a spot where you can sit, sip coffee, and look back at the flowers you just walked through. That’s smart design, people. Your garden pathway doesn’t exist in a vacuum. It needs a reason. A bench, a birdbath, a sculpture, a small table with a lantern. Something that anchors the end of the curve. It doesn’t have to be expensive. My current path ends at a rusty metal chair I found at a yard sale for five dollars. I painted it yellow. It’s ridiculous and I love it. The chair adds a punctuation mark to the entire layout. Without it, the path just stops. With it, the path finishes with a purpose. Even if you never sit in it, your eye will thank you.
Timing and trends: why curved paths are having a moment in 2025
This isn’t a passing fad, it’s a return to something old. Victorian gardens used curved paths all the time. Then modernism killed them in the 60s. Now people are rediscovering that a gentle curve makes a small space feel generous and a large space feel intimate. In 2025, the trend is about softening edges. Hardscapes are getting gentler. People want their backyards to feel like a sanctuary, not a parking lot. If you’re planning a landscaping project this spring or fall, a curved stone garden path is one of the easiest ways to update your whole yard without hiring a crew. You can do it yourself in a weekend. And the cost is just stones and sand. Maybe a string light kit. That’s it. But the payoff is huge: your morning coffee walk, your evening decompress, your weekend barbecues all get a better setting. Honestly, I think it’s the single most underrated landscaping upgrade for under two hundred bucks.
One more thing, seasonal timing. If you’re in the northern hemisphere, late spring is perfect for installing a stone path. The ground is soft but not muddy. You have time to let the plants fill in before summer heat. Fall also works, but you’ll have to wait until next year for the flowers to look full. Either way, do it this year. Don’t put it off. Your backyard won’t design itself.
So there it is. The mistake is straight lines. The fix is a gentle curve, some pink and white flowers, a string of warm bulbs, and maybe a teal chair at the end. That’s it. That’s the recipe. Try it. Walk it. See how fast you fall in love with your own backyard again. I’d love to know what your path ends up looking like. Share a photo? Tag it with your preferred gardening hashtag, or just send it to a friend. Either way, go lay some stones.
#gardenpathway #backyardpath #stonegardenpath #landscapingideas #stringlightgarden
Leave a Comment