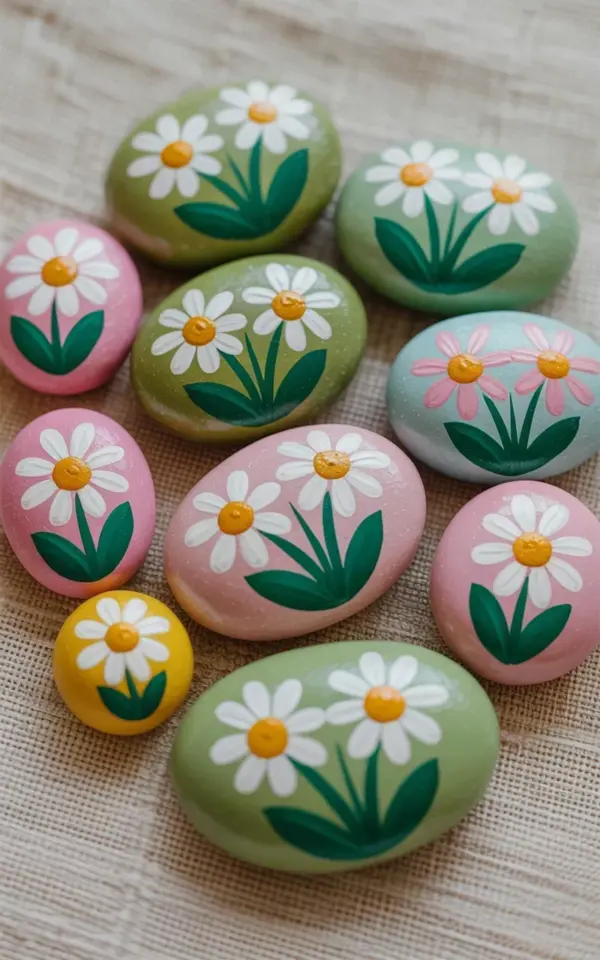
Those nine hand painted flower rocks in the photo, the ones with daisies and pink blooms spread across that light beige fabric, have been sitting on my desk for a week. They look perfect, folk art style and clean lines, all white petals and yellow centers. And I’m going to tell you the one thing that ruins this kind of garden stone art faster than a toddler with a hammer: skipping the weatherproof sealer. Honestly, it breaks my heart every time I see a beautiful floral rock fade into a chalky ghost after one rainy season.
I know, sealing feels like the boring step. You just spent hours painting tiny daisies, maybe a green stem or two, and you want to put that thing outside and admire it. But the sun, the rain, the frost, they don’t care about your effort. They will eat that paint alive. So let’s talk about the mistakes, the fix, and how to keep your hand painted rocks looking like the day you made them.
Why painted garden stones fade so fast outside
Here’s the thing acrylic paint is water-based, and outdoors it’s basically a snack for UV rays. The sun bleaches the pigments, especially reds and pinks, while moisture seeps into the porous rock and lifts the paint film from underneath. That pink flower with the green stem? Faded to a sad peach within two months.
Freeze-thaw cycles make it worse. Water gets behind the paint, freezes, expands, and flakes everything off in little patches. You don’t need a harsh winter to see it either, a few heavy dew nights are enough. If you want your floral rocks to survive more than one season, they need armor.
The sealer mistake that ruins floral rocks (it’s not what you think)
Ok so most people think the mistake is not sealing at all, and that’s a big one. But honestly, I’ve seen plenty of people seal their rocks and still ruin them. They grab the first spray sealer from the hardware store, give the stones one quick mist from a foot away, and call it done.
That thin mist does nothing. It’s not enough to protect the paint, and it often leaves a streaky, tacky surface that attracts dust and dirt. You need multiple even coats, and you need to let each one dry completely. Otherwise you’re basically just making your painted garden stones sticky. A single coat of sealer is the hidden killer.
How to choose the right weatherproof sealer for your floral rocks
Not all sealers are made for outdoor stone. A glossy acrylic spray might be great for a canvas painting, but it won’t hold up to rain on a rock. You want something labeled waterproof, UV-resistant, and ideally made for stone or concrete.
My go-to is a brush-on polyurethane, semi-gloss or matte, because it goes on thick and you can see where you’ve covered. Spray sealers work too, but they need to be applied more carefully. Just check the label for “exterior” and “clear” and “non-yellowing,” because the wrong one will turn your white daisies yellow in six months. Nobody wants yellow daisies, unless you’re going for a wilted look.
Step by step: sealing your hand painted rocks the right way
Let’s walk through it, because this saves so much heartache. You’ll need your completely dry painted stones, a clean workspace, and your chosen sealer. I usually do this outside on a piece of cardboard, but a well-ventilated garage works too.
- Wait at least 24 hours after the final coat of paint. Acrylic paint feels dry in twenty minutes, but it’s still curing underneath.
- Clean the rock gently with a soft dry cloth to remove any dust or fingerprint smudges. Watermarks from your fingers are real.
- Apply the first coat of sealer in thin, even strokes. If you’re using spray, hold it about eight inches away and don’t flood the surface.
- Let it dry completely, then flip the rock and seal the other side. The bottom matters too, because moisture can sneak in from below.
- Add a second coat, or a third. I always do three thin coats on top. It takes an afternoon, but it’s the difference between okay and actually waterproof.
- Let the final coat cure for a couple of days before placing it outside. If you rush it, the sealer stays soft and rain will ruin the finish.
Yeah, it’s a bit of boring work. But so is washing brushes, and you still do that.
My honest opinion on spray versus brush-on sealer for diy garden art
I’m a brush-on person, and I’ll tell you why. Spray sealer feels easier, but it’s hard to get an even coat on an oval rock without overspray drifting everywhere. You end up with thin spots on the edges and a sticky patch right near a stem that you didn’t even notice.
Brush-on lets you work it into the nooks and crannies of the stone. It feels like you’re actually pulling the sealer across the surface, and you can catch missed spots in real time. The downside is you need to wash a brush afterward, and sometimes the brush leaves visible streaks if you mess around too long. But for floral rocks with fine details, brush-on wins. Just use a cheap foam brush and you can toss it without guilt.
Spray sealer does have one advantage, it gets into those annoying little carved holes without pooling. So if your rock has a rough texture, spray first, then follow up with brush-on for the main coat. That’s a pro move, honestly.
Other common rock painting mistakes that drive me crazy
Sealing is the big one, but it’s not the only mistake I see with hand painted flower rocks. So many people use washable kids’ paint. Look, I get it, maybe you’re doing this with a child and you want easy cleanup. But washable paint is designed to come off, so it will, right onto the garden path. Use acrylic paint, even the cheap craft bottles, and it has a fighting chance.
Another thing, not cleaning the rock before painting. Dust, dirt, tiny bits of sand, they all sit between the paint and the stone and cause peeling. Wash your rocks with soapy water, rinse them properly, let them dry completely, and then paint. That extra ten minutes makes everything stick better.
Can you save a hand painted rock if you already skipped the sealer?
If your rocks are already faded and flaky, there’s no magic spray that brings the paint back. You can’t just seal over a mess and expect it to look good. Trust me, I’ve tried. The old paint just sits there, chalky and weird, and the sealer highlights every crack.
What you can do is sand down the flaky areas with a bit of fine grit sandpaper, paint over the whole rock with a fresh coat of acrylic, and then seal it properly. Sometimes all that’s needed is a touch-up on the petals, especially if the yellow centers are still fine. It’s a decent little weekend fix, and honestly, repainting a faded floral rock is almost more fun than starting from scratch. You get a second chance.
So here’s where I land. Those nine stones in the photo, the pastel daisies, the light green background, they look lovely on a table. But they belong in a garden, and to get there, they need a serious coat of weatherproof sealer. Do it right, do it thick, and your hand painted flower rocks will hold their color for a long, long time. If you’ve got a stack of rocks waiting for a paint job, go grab your sealer first. Future you will thank present you, because peeling paint is way harder to love than a little extra drying time.
Leave a Comment