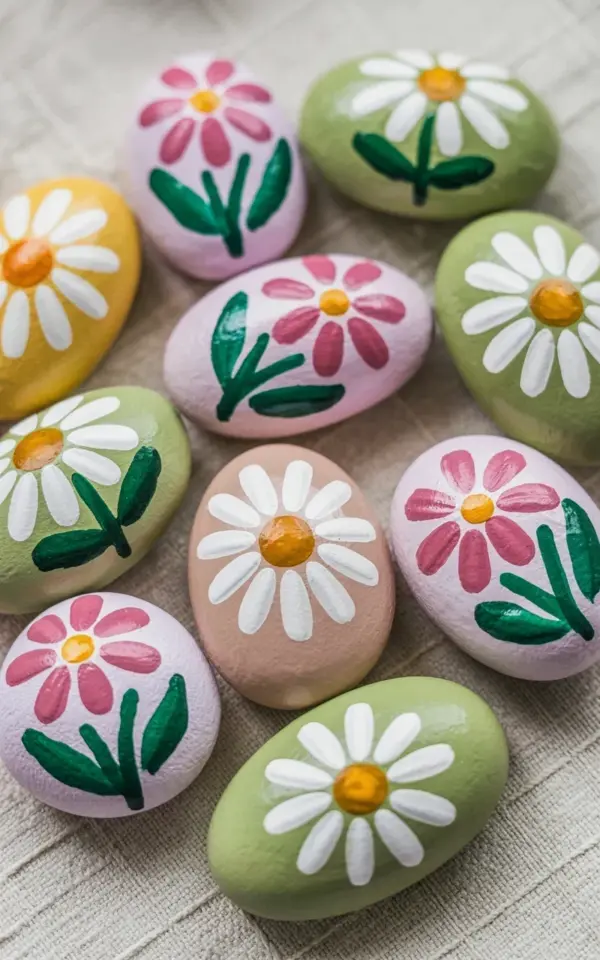
Nine little hand-painted garden stones sit in an overlapping cluster on a piece of beige fabric, each one covered in a different folk art flower. Some have white daisies with yellow centers, some are pink with green stems, and a couple are green daisies painted on a lighter green background. The whole look is soft, simple, and honestly a little addictive.
There is something about the simplicity of folk art that makes it perfect for rock painting. The lines are clean, the shapes are basic, and nobody expects perfect shading or realistic petals. You just need a smooth stone, a few pastel paints, and a steady-ish hand. The rest is just letting the design breathe.
Why Folk Art Flowers Work So Well on Stone
Folk art flowers have been around forever, on old furniture, tinware, and quilts. They survive because they are forgiving. A crooked stem or a slightly lopsided daisy just looks like part of the style, not a mistake.
Painted rocks with folk art designs also handle the outdoors better than more detailed work. Flat colors and simple outlines wear evenly, and even if the sealer fades a little, the charm stays. These specific stones in the photo use a soft pastel palette, which makes them feel more at home in a garden than loud bright colors would.
– Simple outlines hide small imperfections
– Flat color washes mean fewer brush strokes to worry about
– Small motifs fit perfectly on oval and round stones
If you are new to painted rock ideas, this is the style to start with. No blending, no wet-on-wet fuss. Just paint, let it dry, and add a second coat if needed.
Daisy Stones: The Classic That Never Gets Old
The daisy stones in the photo are the ones that caught my eye first. White petals, yellow centers, and not much else. That kind of restraint is rare in DIY crafts, but it pays off.
Daisies are also one of the easiest flowers to paint. You can make six short oval petals around a dot, or you can do eight longer petals if you are feeling ambitious. Either way, it reads as a daisy. I have painted probably forty of these over the years, and every single one looks different, which is exactly the point.
These particular daisies have a slightly uneven, hand-drawn quality to them. That is worth keeping when you make your own. Do not trace or stencil the petals. Just paint them freehand and let the wobble become part of the design.
Pink Blooms and Green Stems for a Soft Garden Pop
Not every stone needs to be a daisy. The pink flowers in this collection are softer, almost like something from an old tablecloth or a vintage dish. They have simple green stems that curve gently, and the whole thing feels a little more formal than the daisies.
These pink ones would look great tucked into a bed of lavender or near pink roses. They do not compete with the real flowers. They just echo the color and add a quiet handmade touch.
When you paint pink blooms, try using two shades. A medium pink for the base and a lighter pink for the center or the tops of the petals. It takes an extra two minutes but gives the flower a subtle depth that flat color cannot match. The stones in the photo keep it simple, but even a tiny bit of layering helps.
Green Daisies on Light Green Backgrounds: The Unexpected One
This is the stone that made me pause. Green daisies on a light green background? It sounds invisible, but on a rock it reads as quiet and strange and lovely. The petals are a slightly darker green than the base, so there is enough contrast once your eye adjusts.
I have never thought to paint green flowers on green stone before, and now I cannot stop thinking about it. It is the kind of idea that feels obvious after you see it, the way all good folk art does.
Green daisies work best in a shadier garden area or on a stone you place among ferns and hostas. They will not shout for attention, but people will notice them when they get close. That is a nicer reaction, honestly, than bright orange blossoms screaming from across the yard.
How to Arrange and Gift Your Painted Rock Collection
The stones in the photo are arranged in an overlapping pattern on fabric, which makes them look like a curated display rather than a pile of craft supplies. That is a good trick to steal for your own space.
You can group painted rocks in a shallow dish, line them up along a garden path, or nestle them into a flowerpot. For gifts, wrap them in tissue or place them in a small canvas bag. Add a handwritten note that says something like “a little folk art for your garden” and you are done.
Painted rocks also work well as tiny housewarming presents, hostess gifts, or just a “thinking of you” surprise. I have given them to neighbors and they end up on windowsills and bookshelves more often than in the actual garden. That is fine with me. There are no rules for where hand-painted stones belong.
Supplies and Simple Steps to Paint Your Own
You do not need a lot to get started, but you do need the right stuff. Smooth river stones or craft store stones are best. Rough or pitted rocks are frustrating to paint because the brush skips over every tiny hole.
– Acrylic paint in pastel colors (white, light pink, sage green, yellow)
– A flat brush for base coats
– A small round brush for petals and stems
– A soft pencil for a light sketch
– A clear acrylic sealer or outdoor varnish
Start by washing the stones with warm water and a bit of dish soap. Let them dry completely. Then paint a base coat over the whole top surface, usually two thin layers, and let it dry. Sketch the flower with a pencil lightly, then paint the petals and leaves. Finish with sealer, ideally two coats, and let it cure outdoors for a day.
One thing I learned the hard way: use a sealer meant for outdoor use if the stones will live outside. Regular craft varnish can turn milky in the rain. And do not skip the sealing step just because the stone itself is water resistant. The paint needs protection.
Final Thoughts on Folk Art Stone Projects
These hand-painted stones are proof that a simple afternoon craft can add real charm to a garden. No expensive materials, no special skills, just a few rocks, some paint, and a willingness to let your lines be a little imperfect. I think the green daisy stone is going to be my next attempt, and maybe a few pink ones for a friend who loves soft colors.
Grab a stone from the yard or a craft store, pick one flower design, and give it a try. You will probably end up making a whole collection, and that is exactly the kind of habit worth having. Save this post for your next crafting afternoon, and if you make a batch of your own, let me know which color combo surprised you.
Leave a Comment