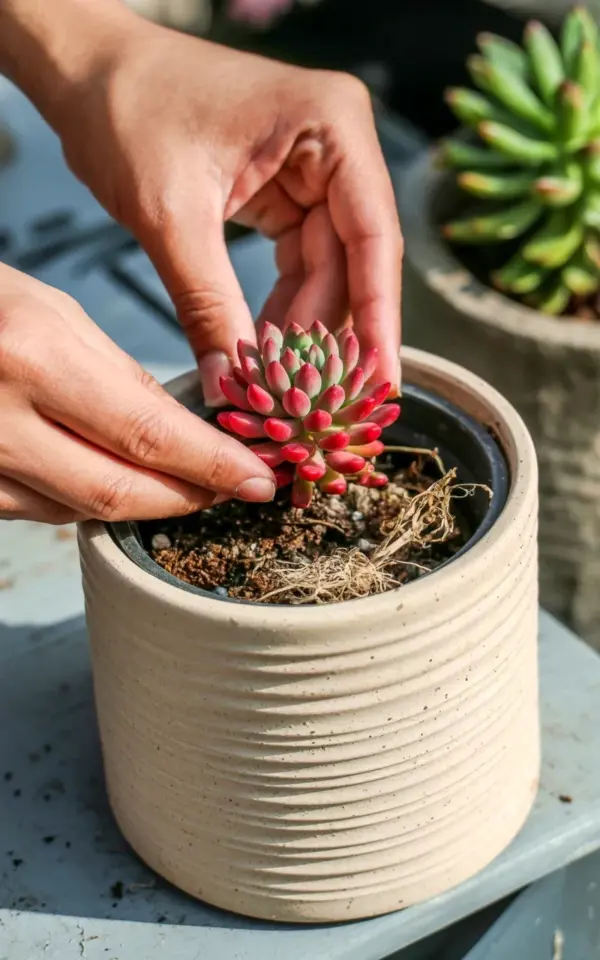
I seriously love how this little succulent planting turned out. The deep red and pink rosettes look amazing against the beige ribbed ceramic planter – natural light makes the colors pop. The soil has some dried bits which gives it that earthy feel. Perfect little DIY planter project for a sunny shelf. Try it with your favorite succulents! #succulentplanting #diyplanter #ceramicplanter #indoorplants #plantcrafts
Why I Chose a Ribbed Ceramic Planter for This Succulent Arrangement
Look, I’ve tried so many different pots over the years. Glazed terracotta, matte concrete, even an old mug (don’t judge, that mug survived three years). But this beige ribbed ceramic planter? It just hits different. The texture alone makes your eyes want to linger. You can run your finger along the ridges, and the natural light catches every groove. In the photo you can see the subtle shadows the ribs cast on the light gray surface underneath – that’s what sold me. Honest to goodness, the planter itself becomes part of the plant’s personality.
Here’s the thing: succulents are already architectural. Their rosettes, their geometric leaves. Pair that with a planter that has horizontal or vertical ribs, and you get this lovely rhythm. Like a conversation between the plant and the pot. Not gonna lie, I spent a good ten minutes just turning the empty planter in my hands before I even touched the soil.
Best Color Combinations for Succulent Plantings in Ceramic Planters
That deep red and pink rosette you see in the image? I didn’t plan it perfectly. I actually grabbed the wrong succulent at the nursery. But the accident worked. The beige ceramic is neutral, warm but not yellow, so it makes red pigments sing. If you have a similar ribbed pot in cream or pale taupe, try these pairings:
- Dark red echeveria (like Perle von Nurnberg but redder) – the contrast is punchy.
- Pink graptopetalum – soft and sweet, almost like the planter is blushing.
- Blue-gray senecio – a cool tone against warm beige, kind of a quiet rebellion. I tried it once with a lime green sedum and it looked like a traffic cone. Stick to jewel tones or pastels.
One weird little aside: I once put a black succulent in a white ceramic pot and it felt like a funeral. Too stark. The beige is a buffer, a friend to both hot and cool colors. So go ahead, let the reds and pinks glow.
Getting the Soil Mix Right for Small Ribbed Ceramic Pots
Ok so you’ll notice in the photo that the soil has some dried bits, little pieces of bark and maybe a stray dead leaf. That’s not sloppiness. That’s deliberate texture. I mixed my own succulent soil (two parts pumice, one part coco coir, one part fine gravel) and then crushed a few dried oak leaves over the top. Why? Because it looks like the earth these things grow in naturally. Also, ribbed ceramic planters often have a narrower opening, so you really need a gritty mix that drains fast, or the moisture hides in the crevices and rots roots.
If you buy bagged cactus soil, please cut it with perlite. At least 50/50. Seriously. I killed three haworthias before I learned that lesson. And here’s the hyper-specific detail: I keep a little jar of dried sphagnum moss pieces on my potting bench just to sprinkle on top for that earthy, crumbly look. No rational reason. It just pleases me. The dried bits in the image are partly that moss and partly just soil that clumped during watering.
How to Arrange Succulent Rosettes for Visual Balance in a Ribbed Planter
You can see my hands in the photo, carefully placing the succulent into the dark soil. I’m not a perfectionist, but I spent maybe two minutes adjusting the angle. Here’s my process: I always start with the tallest or most dramatic rosette slightly off-center. Then I fill around it with smaller offsets or trailing cuttings. The ribbed planter has a repeating pattern, so you don’t want a single centered plant that mimics the symmetry of the ribs – that’s boring. Offset it, let the lines of the pot break against the curve of the leaves.
One tip I swear by: after you place the main succulent, step back. Walk away for thirty seconds. Then come back and look at it from three different angles – top, side, and the angle where the light hits. That’s what I did before snapping the photo. The natural shadows on the ceramic surface tell you if the plant is sitting too deep (shadow pools around the stem) or too high (shadow under the rim looks weird). I adjusted it twice, just a quarter turn.
And don’t pack the soil too tight around the roots. Succulents like a little air. A gentle press is enough. Your hands will know when it feels snug but not suffocated. That’s the vibe in the image – hands placed, not cramming.
Watering Succulents in Ribbed Ceramic Planters Without Drainage Holes
Alright, I have to be real with you. This planter in the photo? No drainage hole at the bottom. I know, I know. But hear me out. Ribbed ceramic planters are often sold as cachepots (a decorative outer pot). I use a tiny nursery pot inside the ribbed one, then cover the rim with some pebbles or a saucer. In the image, you can’t see a nursery pot because I nestled it deep, but it’s there. Trust me, I learned the hard way. I once planted directly into a gorgeous ribbed pot and the ribs trapped moisture against the ceramic wall, leading to black rot within two weeks.
If you must plant directly, water only when the soil is bone dry, and use a pipette or a narrow-spout watering can to target the soil directly, not the sides. Avoid splashing water onto the ribbed surface – those grooves will hold droplets and cause water spots. If you get spots, wipe them off immediately with a dry cloth. I’m not kidding, I have a designated microfiber cloth for my ceramic pots. That’s the level of nerdy we’re talking here.
Other Succulent Varieties That Look Stunning in Beige Ribbed Pots
My rosette in the photo is some kind of echeveria hybrid – deep red in bright light, pink in the center. But don’t stop there. I’ve tried a few other combinations that worked beautifully:
- String of pearls – the spherical beads echo the ribbed texture, like a visual rhyme.
- Haworthia zebra – those white stripes pop against the beige. The ridges of the pot and the stripes of the leaves play off each other. Honestly it’s hypnotic.
- Crassula ovata (jade plant) – too big for a small pot, but if you use a small cutting, the chunky trunk contrasts with the delicate ribs. I tried a mini jade and accidentally killed it by overwatering, but when it was alive? Stunning.
- Aloe aristata – spiky tips break the roundness of the pot. Add some dried leaves on the soil for that earthy feel from the photo.
My personal favorite? The one in the image. That red-pink echeveria. But next time I might try a pale green graptoveria with a single accent of dark purple. Something about the beige ceramic makes every color look more intentional.
Where to Display Your DIY Planter Project for Maximum Light
You can see in the background of the photo a blurred green plant – that’s my philodendron sitting on the same shelf. The lighting is natural, coming from a south-facing window, but filtered through sheer curtains. That’s the sweet spot. A sunny shelf, not scorching direct sun, where the ribbed planter casts soft shadows. I keep my succulent plantings on a small wooden tray on a side table. The beige ceramic catches the afternoon light, and the red leaves almost glow.
If you have a shelf that gets morning sun, put it there. The ridges of the planter will create a gradient of light and shadow across the soil surface, which makes those dried bits and moss pieces look even more natural. Avoid placing it where water can drip onto the ribs from a nearby plant – I had a fern above my ribbed pot once and the constant drips stained the ceramic. Had to scrub with lemon juice. That was a weird afternoon. Anyway, just keep it dry, keep it bright, and enjoy the process.
This succulent planting project honestly brought me more joy than I expected. From picking the planter (I found it at a thrift store for three dollars) to hand-positioning each leaf cluster, it felt like a small, meaningful craft. The photo captures one quiet moment, hands in soil, light doing its work. You should try it with your favorite succulents. Get a ribbed ceramic planter, find a bold red or pink rosette, and play with the texture. It’s satisfying in a way that’s hard to explain – until you see your own hands in that same effortless pose. Go for it.
#succulentplanting #diyplanter #ceramicplanter #indoorplants #plantcrafts
Leave a Comment