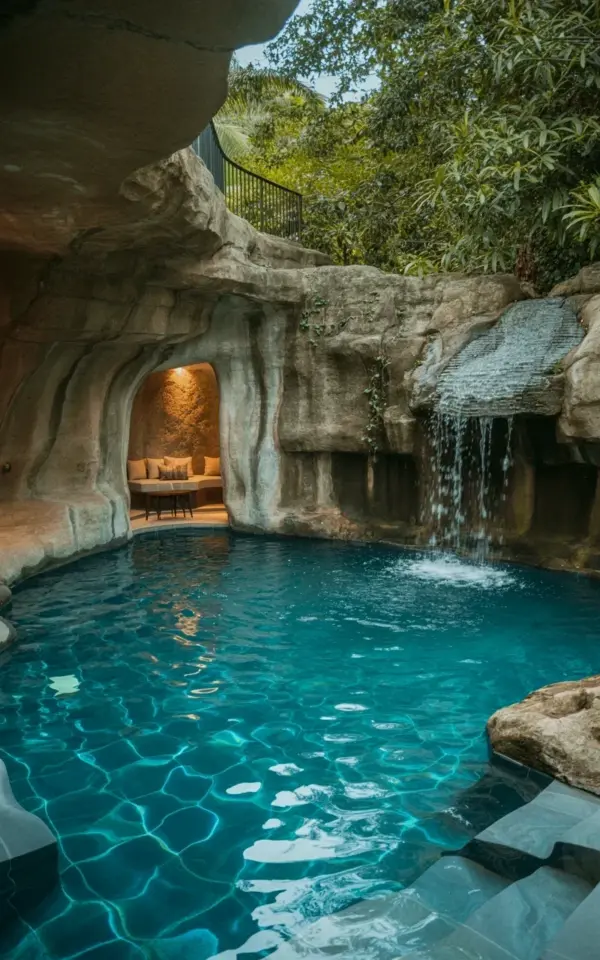
Luxurious underground pool grotto with a natural waterfall cascading into crystal-clear turquoise water. The smooth stone edges curve invitingly, while warm light spills from an archway that leads to a hidden seating area. It looks like a private spa hidden inside the earth, a literal undergroundpool built for escaping the heat. And honestly, let’s be real, most of us aren’t carving a limestone cave out of our backyard anytime soon.
That doesn’t mean the fantasy is dead. You can absolutely borrow the soul of this image, the mist, the rock, the glow, and adapt it for a real budget. Whether you have a basic fiberglass pool or just a patch of grass, the principles of a pool grotto are more attainable than you think. Look, the core of this design is about creating a sense of discovery, a hidden nook that feels a world away from the lawn furniture. Let’s look at how to actually pull that off without a second mortgage.
Why We Crave the Cave: The Psychology of a Grotto
There is something primal about a sheltered body of water. The photo shows a natural waterfall feeding a pool that is protected by rock on all sides, and that enclosure is what changes the entire mood. It strips away the distraction of the open sky and the neighbor’s fence, focusing all your attention on the water itself.
It feels secret. It feels safe. And that emotional shift is the real luxury, not just the rockwork.
When you sit inside a stone archway with water trickling nearby, your shoulders drop. The noise of the world gets filtered out by the sound of splashing, and the cool air trapped against the stone makes the heat feel like a distant memory. You aren’t just swimming; you are entering a different headspace, which is exactly what a summer backyard should offer.
The Real Cost Breakdown: From DIY Kits to Full Cave
I have seen homeowners transform a plain pool into a mini paradise using prefabricated rock panels that cost around $15,000. On the flip side, the fully custom, shotcrete cave you see in the photo could easily run you $150,000 or more. The gap is huge, but the middle ground is where the smart money goes.
Here is the thing, you don’t need to build a full cavern. You need a focal point.
If your pool already has a tanning ledge or a deep end, you can anchor a prefab waterfall unit that features a curved rock canopy overhead. Companies like Rock Waterfalls sell modular foam and concrete systems that look surprisingly authentic once they are painted and sealed. Honestly, the painting and staining step is where these kits win or fail, so budget for a professional mason if you have any doubt about your own skills.
Waterfall Installation Without the Headache
The waterfall in the inspiration photo dumps a serious amount of water from the right side, creating that misty, cool atmosphere. To recreate that effect, you need a pump that can handle roughly 100 gallons per minute per foot of waterfall width. Most homeowners underestimate the pump size and end up with a pathetic trickle that makes a noise like a leaky faucet.
I made this mistake once with a smaller feature, and the sound was more annoying than relaxing. Trust me, you want the pump to be oversized.
A good rule of thumb is to work with a 1.5 horsepower pump or larger for a grotto waterfall. That will give you the volume to create that foamy, white-water base where the water hits the pool. You also want to build a slightly recessed basin at the base of the fall, because that is where the water gathers and creates the glassy, ripple effect you see in the turquoise water.
Lighting and Stone: The Warm Archway Effect
Look at the photograph again and notice how the stone archway radiates warmth. That isn’t sunlight, it is strategically placed low-voltage lighting recessed into the rocks. You want a mix of 3000K lights, which is a warm amber glow, to mimic the feel of a lantern rather than a security light.
The stone choice matters just as much as the bulbs. Limestone and travertine hold heat well and have that soft, pitted texture that looks natural, but they are softer and require regular sealing.
Here is a cheaper alternative that looks killer: faux concrete rock panels that have been textured with real sand and colored with iron oxide pigments. They give you the irregular, organic look of the cliff face without needing a geological survey. If you are working with an existing structure, plan for the lighting to be tucked into crevices so the source is hidden and only the glow is visible.
Plants and Airflow: Making It Feel Like a Secret Spa
A pool grotto needs to feel alive, and that means managing the humidity and the greenery carefully. You want plants that thrive on the mist and splashes, but you also don’t want root systems cracking your stone. I personally love adding potted ferns and bromeliads near the edges, positioned so they catch the spray but aren’t submerged.
Here is a quick list of plants that work well in this environment:
– Boston ferns for that lush, hanging volume near the rock edges.
– Areca palms to soften the hard stone corners and add height.
– Golden pothos, which will climb the rocks and trail down, giving a wild, overgrown feel.
– Ficus pumila (creeping fig) for a green wall effect.
But here is the practical side: ensure you have proper ventilation if you are often covering the pool. If the enclosure is tight and enclosed, you will get trapped moisture which leads to mold and rust on any metal fixtures. We run a simple exhaust fan on a timer for an hour each evening to keep the air moving, because that humid cave atmosphere can be great for skin but terrible for electronics and patio furniture.
What To Skip: The Mistakes That Ruin the Vibe
Do not paint your pool a dark navy blue and assume it will look like a natural pond. The water in the image is clear turquoise, which requires a white or light aggregate plaster finish to bounce the light. Also, skip the cheap plastic foliage; it fades and looks dusty within a season, and there is nothing sadder than a fake flower next to a real waterfall.
Another mistake is making the structure too small. A grotto that barely allows you to sit upright will feel like a coffin, not a spa. Make sure you can stand under the archway and that there is a bench cut into the stone or added as a submerged seat. It should invite you to linger, not just be a photo opportunity from the deck.
When to Hire a Pro vs. Weekend Warrior
I am all for DIY, but there are limits. Digging and shotcrete? Let the pros handle it.
Running the electrical and plumbing? Definitely licensed contractors. The assembly of the foam rock kits, however, is a completely manageable weekend project if you have a few friends and patience. The key steps involve cutting the panels to fit, applying the adhesive, and then coating everything with the cementitious shell. It takes about three days of hard work, but the result is a grotto that looks built in, not bolted on.
One specific detail that always trips up DIYers: slope the rock ledge slightly downward toward the pool. If you build it level, the water will sheet sideways and erode the seams. That little forward angle directs the cascade into the center of the pool, creating that thunderous splash effect without leaks.
Underground pool grotto projects are certainly a labor of love. But even a modest version, a simple rock archway with a decent pump, transforms your summer afternoons into something that feels like a resort stay.
So, save this idea for that future weekend project, or show it to the contractor you’ve been planning with. Your backyard can be that place where the outside world fades away, and starting your day with a quick swim under a waterfall is a ritual worth building for.
Leave a Comment